Friday, April 29, 2011

Let's Talk Slaw


Just like banana bread and brownies, cole slaw can be made a million different ways.  This post is about my slaw and your slaw.  I have perused some blogs looking for slaw recipes and made some links if you'd like to check them out. If you would like to add your way of slaw to the list, let me know and I will add it on.

The idea for this post came to my while we were visiting our relatives in Tennessee.  My sister-in-law's father and his wife loved my Mom's slaw.  My Mom gets compliments on her slaw where ever she takes it.  I make the same slaw and also receive compliments on it.  SO I thought I would share it with you.  So when I write down what we do, you will say whats the big deal- so simplistic.  Yes it is but I think it is the technique rather than what we add that makes the slaw so palatable.  Not to mention it has a bit more staying power than other slaw's. 
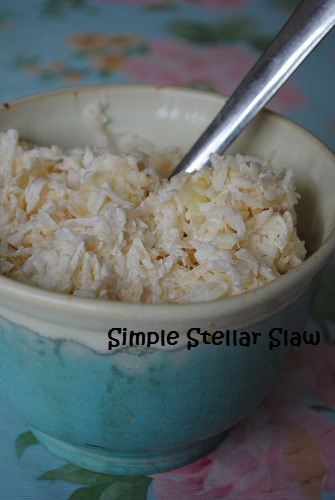
Simple Stellar Slaw

1 head of cabbage
1 small onion
1 cup or so of mayonnaise (the best you can buy)
lots 'o' salt

Shred the cabbage your preferred way, either on a knuckle grater or in a processor.  I do the processor but some people swear by their knuckle busters.  Now here is the important part, put in in a colander and salt it heavily.  When I say heavily, I mean watch the salt pour out of the shaker like nobody's business.  And don't fret because you will have the chance to wash it all away later.  Let it sit for an hour if you can, no shorter than 15 minutes.  The salt is going to pull the water right out of the cabbage.  After the desired length of time, rinse ( I will be honest here, sometimes I don't rinse), take a handful and squeeze the cabbage.  Put the dried handful of cabbage in the bowl you are going to mix in.  After all off the cabbage/onion mixture is squeezed add in your desired ingredients.  In my case that would be only the mayo (Hellman's to be exact- I am not paid to say that). Serve and enjoy.  The next day your slaw will not be runny as all of the water has been squeezed out of it.

Other Stellar Slaw's
And may I say if you do my technique it might amp up some of these slaw's if they don't already advise it.

Blue Cheese Coleslaw, The Perfect Pantry
Celeriac Coleslaw, Stephen Cooks
Coleslaw, Simply Recipes
Coleslaw with cilantro and jalapenos, Homesick Texan
Colesalw with Cream Buttermilk Dressing, One Perfect Bite
Columbian Coleslaw, My Columbian Recipes
Copy Cat KFC Coleslaw Recipe, Amanda's Cookin'
Fennel Coleslaw, A Good Appetite
Japanese Slaw with Daikon Radish, Yours Truly
Killer Coleslaw, Stephen Cooks
Kohlrabi and Apple Slaw with Creamy Coleslaw Dressing, A Veggie Venture
Lemon Coleslaw, One Perfect Bite
Lemon Poppy Seed Cabbage Salad, Yours Truly
Lime and Peanut Coleslaw, 101 Cookbooks
Not Your Mama's Cole Slaw, Smitten Kitchen

Radish Cranberry Coleslaw, Dianasaur Dishes

Seedy Tahini Vegan Coleslaw, Healthy Happy Life
Sesame Orange Coleslaw, Fat Free Vegan Kitchen
Snappy Crunchy Cole Slaw (No Mayo),  Gluten Free Goddess
Spicy Asian Coleslaw, Yours Truly
Tamarind Cole Slaw, He Cooks, She Cooks
Toasted Walnut Coleslaw, Eliza Domestica
Vegan Coleslaw with Peanut Dressing, Gluten Free Goddess
Warm Winter Coleslaw with Chili Lime Dressing, Gluten Free Goddess

Tuesday, April 26, 2011

One a Penny, Two a Penny, Hot Cross Buns

I know there are a few that do not have icing.  There are a few rebels in our family that forgo the icing (how could they?)

We just returned from our trip and I am settling back into my routine.  I hope to post some pics from our trip.  In the mean time I thought I'd share the hot cross buns I had made last week.
Hot Cross Buns

for the dough

2 cups milk
½ cup oil
½ cup sugar
2 ¼ teaspoons active dry yeast
4 cups unbleached all-purpose flour, plus additional as you knead to keep it from getting sticky
½ teaspoon baking powder
½ teaspoon baking soda
2 teaspoons salt
¼ cup sugar
1 teaspoon cinnamon
½ teaspoon cardamom
¼ nutmeg
½ cup raisins

for the glaze:

1 lg egg white
a tablespoon of milk

for the icing

1 large egg white
powdered sugar
tablespoon of milk

Combine milk, oil, and sugar in a saucepan. Stir and heat until very warm but not boiling. Turn off the heat and allow to cool until mixture is still warm.You should be able to comfortably hold your finger in it for about 15 seconds. If you use a thermometer, about 110F.

Sprinkle yeast over mixture. Add 4 cups of flour and stir to combine. Mixture will be very sticky. Cover with a towel and set aside for 1 hour.

Add in about a 1/2 cup flour, the baking powder, baking soda, and salt. Stir until combined.

In a small bowl, combine 1/4 cup sugar with cinnamon, cardamom and nutmeg. Set aside.

Flour your kneading surface.. Press to slightly flatten dough. Sprinkle on most of the sugar/spice mixture. Sprinkle on the raisins. Then fold the dough over on itself. Repeat folding the dough over on itself until the raisins are incorporated in the dough.

Divide dough into about 16 pieces. Roll into balls, then turn the edges under themselves slightly. Place on a lightly greased cookie sheet. Cover and allow to rise in a warm place for about 45 minutes.

Preheat oven to 400 degrees

Brush the buns with egg wash (Mix 1 egg white with a splash of milk.) mixture.

Bake for 20 minutes, give or take, or until tops of buns have turned nice and golden brown.
Remove from pan and allow to cool on a cooling rack.

For the icing:
Beat 1 egg white until soft peaks form and fold in powdered sugar. Add in a very small amount of milk as needed for consistency.

Sunday, April 24, 2011

Happy Easter

Photo from the Graphics Fairy.Click here to visit her site.

I'd like to wish you all a Happy Easter if you celebrate the Holiday. As always, whether you celebrate it or not, I wish you joy, peace and grace, this day and every day.

We are away until later in the week. I will be sure to post when we return. We have had an exciting vacation away.

Thursday, April 21, 2011

Gomen

My lunch.

My daughter's lunch.
Notice any differences?  Ah, yeah.  I hope one day our children eat like me and my husband.  Maybe not as much as my husband and I, but the quality of the food.  Not that hers is bad, its just that the vegetable quotient could be upped a bit  a lot!

After making the niter kibbeh, I made this lunch for myself.  I had previously boiled the collard greens, reserving the cooking liquid for soup.  For my lunch I cooked the drained greens in a tablespoon of niter kibbeh, along with a minced small onion. While I know a tablespoon of butter is a lot of fat and a 100 calories, the greens make up for this.  Wow, like total flavor experience.

You know when we go out for Ethiopian, I have to say that my favorite dishes are the vegetarian ones.  My husband usually has the raw beef.  (Totally grosses me out). I am all about the lentils, the collars, the tomatoes, all of that.  The Ethiopians have a great knack for making vegetables and legumes taste outstanding!

Gomen
recipe adapted from this recipe.

1 bunch collard greens
1 medium onion, chopped
a tablespoon or so of niter kebbeh
salt and pepper to taste

Wash the greens and drain.  Cut the coarse part off of the ends of the stems (about 1/2-1 inch). Chop the stems well and set aside. Chop the leaves coarsely and set aside.  In a pot, heat up niter kebbeh. Add the onion, chopped collard stems and some salt. Sauté until the onion turns clear and the chopped stem has softened.  Add the collard leaves and stir well. Cook until tender adding a small amount of water if necessary to help the greens steam. Keep covered for a while, stir and cover again, until softened to your liking.) Season with salt and pepper and arrange on injera with some other stews.

Monday, April 18, 2011

Niter Kibbeh, the cornerstone of Ethiopian Cuisine

In order to make some of my beloved Ethipian dishes, I first had to make this food love elixir, niter kibbeh.  As far as I am concerned this is the corner stone of many amazing Ethiopian dishes.  Since I am on a total Ethiopian food kick, I had to make it.  A few other things that I have to make too, which I will share as the next couple weeks roll on.  

Niter Kibbeh
Inspired by this post at Serious Eats

1 pound of butter
2 3 inch cinnamon sticks
2 cloves
2 bay leaves
1 teaspoon fenugreek ( I used to no like this- I am slowly acquiring a taste for it)
1 teaspoon coriander seeds
8 green cardamon pods
6 cloves garlic
1 small onion, minced
1 inch piece of ginger

In a saucepan, slowly melt butter.  Add in 2 whole cloves, bay leaves, garlic, onion, ginger and cinnamon. While that is going, in a frying pan toast coriander, fenugreek and cardamon. Once fragrant, remove from heat and add to butter mixture.  Keep this on the burner, flame very low.  You want this to be a really slow process.  After about an hour or more, the solids will turn a light golden color.  At this point it is ready.
Strain the solids through cheesecloth and strainer.  Once strained ball up the spices in the cheesecloth and give a gentle squeeze.

There you have a really powerful, flavorful start to many dishes.  Heck you could even fry an egg in this amazing liquid.  Yum!
Note:  If you decide to taste some of the used spices after the draining, you will find they are a bit bitter.

Saturday, April 16, 2011

Elvis Banana Bread

 Got some of these yellow-ish beauties?
Make this Elvis Banana Bread.  Why Elvis?  Well, he really liked his peanut butter and banana sandwiches. (Ah, and bacon on that too- I did not do that here but I have to say I will try that sometime). For this rendition of banana bread, I decided to add some peanut butter chips as well as chocolate mini chips.  Why?  My husband is forever smearing peanut butter all over bananas and chomping them down like a madman.  I myself like a peanut butter and banana sandwich once in a while, sometimes toasted sometimes not (Sorry Elvis, I have never fried it).  Hmmm.  Haven't had one of those lovely sandwiches in a while... 

My kids went crazy over this bread.  Gone in one 24 hour period.

Elvis Banana Bread

1¾ c. unbleached flour
1½ c. granulated sugar
½ teaspoon baking powder
1 teaspoon baking soda
¾ teaspoon salt
½ cup mini chocolate chips
3/4 cup peanut butter chips
1 cup mashed overripe bananas
2 large eggs
1/3 cup buttermilk
½ cup vegetable oil
1 teaspoon pure vanilla extract

Preheat oven to 350. Spray three mini loaf pans or muffin pans with cooking spray. Don't use a large loaf pan as it will not bake in the center.  If you desire one large cake, use a 13 x 9.

In a medium sized bowl mix together flour, sugar, baking powder, baking soda, and salt into large bowl.In a small bowl, combine mashed bananas, eggs, buttermilk, oil and vanilla. Pour liquid ingredients into flour ingredients and stir until just combined. Don't over stir.

Divide batter among loaf pans and bake for 30-35 minutes or until deeply golden brown and toothpick inserted into center comes out clean.

Possible Add Ins for future ones:  

-bacon bits
-a tablespoon to two of peanut butter to the mix

Monday, April 11, 2011

Lemon Poppy Seed Scones

I love a scone with coffee or tea.  They are meant for each other.  For Christmas I received this really nice scone pan.  Love it!  It makes things much easier when dealing with the sticky dough of a scone.


My cousin sent me this video.  I totally love it.  It sums up perfectly how I have been feeling about life lately.  I try to worry less about appearances and more about the substance of my life.  So much is wasted just to keep up with other people or to look good.  I understand it.  I have been there and in many ways am still there.  But what really matters in this life?  You have to ask yourself that question all the time.  We are so bombarded and inundated with what to buy, what we should have in our life, where we should go, what we should watch, read or listen to.  Did you ever take a step back and really take a good hard look at how you are personally controlled by advertisements and media.  Sometimes it takes another person to get you to see those things, or maybe a life experience that rocks you or maybe a move to another culture. 

Lemon Poppy Seed Scones

3 cups all-purpose flour
1 cup sugar
3 tablespoons poppy seeds
1 tablespoon baking powder
2 teaspoons grated lemon zest
1 teaspoon salt
10 tablespoons chilled unsalted butter, cut into small pieces
1 large egg
2 tablespoons fresh lemon juice
1/3 cup whole milk + 2 tablespoons


Preheat oven to 375F Spray coat a scone pan or a regular pan with cooking spray.

In a processor or in a bowl, combine flour, sugar, poppy seeds, baking powder, lemon zest and salt.  Whirl the dry ingredients together.  Add in the butter and pulse the processor on and off until the mixture resembles course crumbs.  Then add the lemon juice, egg and whole milk. You may or may not need the extra 2 tablesdpoons of milk- depends on your humidity level.  Dough will be sticky.

Transfer the dough with floured hands from the bowl to the pan.  Place in middle rack of oven and bake for about 25 minutes.


Saturday, April 9, 2011

Amaretto Cheescake

It was my husbands birthday.  We had not had cheesecake in a long time.  He likes having a shot of amaretto on Saturday night once in a while.  I rolled with it.  I found the cheesecake recipe at Fine Cooking and the amaretto sauce online. I know cheesecake is already pretty decadent but this was my husbands birthday and sauce, in my opinion, always makes things exponentially delicious. Ah, indeed.

Here are a few tips that you may or may not already know about trying to avoid cracks.  Do not beat your batter too much after you add your eggs.  All you mixing should be done before that point.  The other thing I do that works most of the time is that I turn off my oven when I see it is not totally set in the middle- still having lots of jiggle.  I do not take it out.  I let it cool with the oven.  And I think one of the most important tips, which is the hardest is knowing when it is ready. If it is set too much, as it cools it continues to bake and you will get the famous crack that everyone tries to avoid.  Truth be told, who cares- it still tastes amazing!

This cake is rich, not too sweet and very creamy and delicious. A nice chocolate sauce would be good on it too  The next time I make it, I would add a 1/2 teaspoon of almond extract. And maybe som amaretti cookies for the crust instead of grahams.


Amaretto Cheesecake
Largely adapted from this recipe at Fine Cooking

the cheesecake

4 8-oz. packages cream cheese, at room temperature
2 Tbs. all-purpose flour
pinch of  salt
1-1/4 cups granulated sugar
3 Tbs. amaretto
1 Tbs. pure vanilla extract
4 large eggs, at room temperature

the crust:

8 oz. graham crackers, finely crushed (2 cups of crumbs)
3 Tbs. granulated sugar
7 Tbs. unsalted butter, melted

To make the crust:

In a bowl combine crumbs and sugar, stir.  Pour in melted butter and stir until the crumbs are saturated and starting to clump.  Pour into a 9 inch springform pan and press into bottom and up sides about 2 inches.  The bottom of a glass will work well for pressing it in.  Bake in a preheated 375F oven for about ten minutes.

To make the cheesecake:

In a mixer beat cream cheese, flour and pinch of salt for about five minutes, scraping down sides periodically. Add the sugar and mix until well blended and smooth.

Add vanilla and amaretto, mix until combined.  Add eggs one at a time being careful not to over beat. Pour the filling into the crust and place in a 300F preheated oven.  Bake for about 60 minutes.  I turned off my oven after 55 minutes and just left it in.  Chill overnight.
 
Amaretto Sauce
Adapted from this recipe at Food and Wine
.
1 stick unsalted butter (4 ounces)
1 cup confectioners sugar
3 tablespoons amaretto
2 egg yolks

In a double boiler, melt the butter. Slowly whisk in the sugar until the mixture is creamy, about 30 seconds. Add the amaretto and then the egg yolks, 1 at a time, whisking constantly. Cook, whisking constantly until the sauce is the consistency of honey and reaches 160°, about 4 minutes.

Wednesday, April 6, 2011

SPICY ASIAN NOODLES

This is a real simple salad.  You can find Asian Noodle type salads all over the internet.  I got this idea from Cooking Light.  I never tire of these salads, light, delicious and so versatile.  I made it the other night for dinner and the leftovers were gone the next day.  So I made it for lunch today and packed up the remainder for lunches (no meat today but I used shrimp the other day).  With the price of food rising, we are eating more pasta and rice that is for sure.

SPICY ASIAN NOODLES
Adapted from this recipe at My Recipes, aka Cooking Light

Head of romaine chopped
1/4 cup hoison
2 tablespoons soy sauce
1 tablespoon toasted sesame oil
2 garlic cloves, minced
1 tablespoon finely grated fresh ginger

3 tablespoons rice wine vinegar
1 tablespoon chili garlic sauce
14 ounces rice noodles

Boil a pot or kettle of water.  Place dry noodles in a heat proof bowl.  Pour boiling water over them.  Cover and let sit for about 7 minutes.  Drain and set aside.

While noodles are draining mix up the sauce: hoison, sesame oil, garlic, ginger, rice wine vinegar and chili garlic sauce. Whisk together.  Pour over noodles.  Add chopped green onions and cilantro and stir. Spoon noodles over bed of romaine and garnish with toasted peanuts.

Monday, April 4, 2011

Moroccan Calamari


Here is one of the reasons that I love the internet. If you have an ingredient or two- you just plug them into the search engine and you are rewarded with a plethora ( I always look for opportunities to use that word) of recipes.  I usually take a handful and combine them to make my own creation.  Armed with a package if calamari (that I did not want to fry) I began my search.  Lo and behold I came across this recipe for Moroccan Calamari by this girl at her site.  WOW.  Like wow.  SO good.  I never thought I would like calamari in sauce.  It is one of my husbands favorites from growing up.  Me, I have never been a fan of tomatoes with seafood. Thank you for this awesome recipe

MOROCCAN CALAMARI
Slightly adapted from this recipe here at Cooking With Alia

2.5 pounds of calamari (squid) - cut into rings
1 cup onion, chopped
2 cloves garlic, minced
1/4 cup of finely chopped parsley
1 quart of tomato sauce (16 oz)
2 tablespoons of olive oil
1 teaspoon of salt
1/2 teaspoon of pepper
2 teaspoons of paprika

Saute onion in oil until translucent.  Add garlic cook one minute more.  Add the rest of the ingredients besides the squid.  Cook for about five minutes covered.  Add calamari and cook uncovered at a slow simmer for about an hour.  Serve with crusty bread or pasta.  Delicious!