Pages

Wednesday, December 30, 2009

Asian Flavored Crab Cakes


These will delight you. Not just because they taste great but because everything can be done in advance. The only thing you have to do when you are ready to eat them is to pop them in the oven. That is my kind of entertaining.

Happy New Years everyone!

Asian Flavored Crab Cakes
adapted from this recipe.

16 ounces jumbo lump crabmeat
1/2 cup mayonnaise
4 scallions, trimmed and finely chopped
1/4 cup soy sauce
1 teaspoons wasabi powder
zest of one lime
1/2 cup plain breadcrumbs
2 tablespoons panko crumbs
1/2 cup all-purpose flour
Coarse salt and freshly ground pepper
2 large eggs

Flake crabmeat with a fork in a medium bowl; stir in mayonnaise, scallions, soy sauce, wasabi, and zest. Stir in 2 tablespoons panko crumbs. Cover with plastic wrap; chill 1 hour.

In a medium bowl, whisk together flour, salt, and pepper; set aside.
In a small bowl, beat eggs with 1 tablespoon water; set aside.
In a shallow bowl, stir together sesame seeds and breadcrumbs. Form one tablespoon crab mixture into a ball; dip in seasoned flour. Flatten into a cake. Build up sides a little and rounding it out. Repeat with remaining crab mixture. Dip cakes in egg mixture, then roll in breadcrumb mixture.

Heat oil in a large skillet over medium heat until hot but not smoking. Add half the crab cakes; cook, turning once, until golden and crisp on both sides, about 4 minutes. Using a slotted spatula, transfer to paper towel-lined plates to drain. Repeat with remaining cakes, adding more oil if needed. Let cool completely.

Transfer crab cakes to a baking sheet. Freeze (uncovered) until firm, about 1 hour. Transfer to an airtight container; freeze until ready to use, up to 6 weeks. To serve, preheat oven to 425 degrees. Place the crab cakes on an ungreased baking sheet, and bake until heated through, 10 to 14 minutes.

On New Years Eve, I will garnish these with pickled ginger as the recipe suggests.

Monday, December 28, 2009

Feeling Snacky- try a pickled carrot.

I absolutely loved these. I saw a recipe in Everyday Food in Octoboer 2009 and I adapted it to my taste and what I had on hand. I really liked it. I polished off the jar in a couple, three days. Just the right thing when you are feeling snacky.

QUICK PICKLED CARROTS
adapted from this recipe.
Makes about 2 cups.

1/2 cup white-wine vinegar
1/2 cup sugar
1 T kosher salt*
4 or more medium carrots, julienned (until I filled a quart jar)
1 teaspoon red pepper flakes
2 sprigs of dill
3 cloves of garlic halved

In a sauce pan combine vinegar, sugar, and salt. Heat to a boil and salt and sugar is disolved. Pour over the carrots in the quart jar. Cool, cover, and refrigerate at least 2 hours but preferably for a couple days.

* the reason you use kosher salt is because it does not contain iodine. Iodine discolors vegetables or fruit in the canning process.

Saturday, December 26, 2009

Orange Chocolate Pizzelles

Before the Holiday season is gone, I wanted to share this pizzelle recipe with you. It's not the traditional anise pizzelles but rather an orange chocolate recipe. The nice thing about pizzelles is that they keep for quite a while. After the holidays are over you can put a dollop of ice cream on them and some fresh fruit and you have a wow dessert that's real simple to put together.

Orange Chocolate Pizzelles

6 eggs
3 1/2 c. flour
1/2 cup cocoa powder
1 1/2 c. sugar
1/2 lb. butter, melted
3 tsp. baking powder
zest of one orange
2 T Grand Marnier
1 T vanilla extract

Beat eggs. Add sugar gradually. Beat until smooth. Add melted and cooled butter. Add flavorings: anise, vanilla, orange and lemon. Add flour, cocoa powder and baking powder and add to egg mixture. Dough will be sticky enough to be dropped by teaspoon onto pizzelle pan. Makes 2 at a time baking approximately 30 seconds on iron. Makes 60 to 80 pizzelles per batter.

Friday, December 25, 2009

Merry Christmas 2009

Twas The Night Before Christmas

Twas the night before Christmas, when all through the house
Not a creature was stirring, not even a mouse.
The stockings were hung by the chimney with care,
In hopes that St Nicholas soon would be there.

The children were nestled all snug in their beds,
While visions of sugar-plums danced in their heads.
And mamma in her ‘kerchief, and I in my cap,
Had just settled our brains for a long winter’s nap.

When out on the lawn there arose such a clatter,
I sprang from the bed to see what was the matter.
Away to the window I flew like a flash,
Tore open the shutters and threw up the sash.

The moon on the breast of the new-fallen snow
Gave the lustre of mid-day to objects below.
When, what to my wondering eyes should appear,
But a miniature sleigh, and eight tinny reindeer.

With a little old driver, so lively and quick,
I knew in a moment it must be St Nick.
More rapid than eagles his coursers they came,
And he whistled, and shouted, and called them by name!

"Now Dasher! now, Dancer! now, Prancer and Vixen!
On, Comet! On, Cupid! on, on Donner and Blitzen!
To the top of the porch! to the top of the wall!
Now dash away! Dash away! Dash away all!"

As dry leaves that before the wild hurricane fly,
When they meet with an obstacle, mount to the sky.
So up to the house-top the coursers they flew,
With the sleigh full of Toys, and St Nicholas too.

And then, in a twinkling, I heard on the roof
The prancing and pawing of each little hoof.
As I drew in my head, and was turning around,
Down the chimney St Nicholas came with a bound.

He was dressed all in fur, from his head to his foot,
And his clothes were all tarnished with ashes and soot.
A bundle of Toys he had flung on his back,
And he looked like a peddler, just opening his pack.

His eyes-how they twinkled! his dimples how merry!
His cheeks were like roses, his nose like a cherry!
His droll little mouth was drawn up like a bow,
And the beard of his chin was as white as the snow.

The stump of a pipe he held tight in his teeth,
And the smoke it encircled his head like a wreath.
He had a broad face and a little round belly,
That shook when he laughed, like a bowlful of jelly!

He was chubby and plump, a right jolly old elf,
And I laughed when I saw him, in spite of myself!
A wink of his eye and a twist of his head,
Soon gave me to know I had nothing to dread.

He spoke not a word, but went straight to his work,
And filled all the stockings, then turned with a jerk.
And laying his finger aside of his nose,
And giving a nod, up the chimney he rose!

He sprang to his sleigh, to his team gave a whistle,
And away they all flew like the down of a thistle.
But I heard him exclaim, ‘ere he drove out of sight,
"Happy Christmas to all, and to all a good-night!"

by Clement Clarke Moore (1779 - 1863) wrote the poem Twas the night before Christmas also called “A Visit from St. Nicholas" in 1822.

Thursday, December 24, 2009

Daring Bakers: Gingerbread Houses

I tried making a gingerbread house when my oldest daughter was about two. Goodness gracious. Candy everywhere... she was all sugared up for hours. I wasn't exactly tickled with the process. I actually said to myself, never again. Well, if there is one thing I learned in my life so far is to never say never. Yup. I did the challenge. And I had fun! Yes, despite what some of the DB'ers are saying it does taste good. My kids have been eating the cookies we cut out from the dough.
After I finished my house I constructed miniature houses for my kids to decorate. We had a blast. I really enjoyed doing it with the kids and I hope to do it next year as well.
Okay I hleped my youngest a little here. But all I did was make that flowerish shaped thingy.


Okay, when Mom is not looking let me stick my finger in my frosting and eat it. Who cares about the house, I'm in it for the sugar.
The December 2009 Daring Bakers’ challenge was brought to you by Anna of Very Small Anna and Y of Lemonpi. They chose to challenge Daring Bakers’ everywhere to bake and assemble a gingerbread house from scratch. They chose recipes from Good Housekeeping and from The Great Scandinavian Baking Book as the challenge recipes.

We had a choice of two recipes. I chose this one and I did accidentally make an adjustment. When all was said and done though it worked out fine.

My Tips for Gingerbread House Building:

1. Plan, plan, plan.
2. Construct blue print and template.

3. Immediately after baking cut the forms again to ensure perfect construction. I cant stress this step enough. If your pieces are out of alignment, the whole thing will be way more difficult.
4. Think outside the gingerbread box.

Anna's Recipe:
Spicy Gingerbread Dough (from Good Housekeeping) http://www.goodhousekeeping.com/recipefinder/spicy-gingerbread-dough-157...

2 1/2 cups (500g) packed dark brown sugar
1 1/2 cups (360mL) heavy cream or whipping cream
1 1/4 cups (425g) molasses
9 1/2 cups (1663g) all-purpose flour
2 tablespoon(s) baking soda ( I used 1 tablespoon)
1 tablespoon(s) ground ginger

Directions

1. In very large bowl, with wire whisk (or with an electric mixer), beat brown sugar, cream, and molasses until sugar lumps dissolve and mixture is smooth. In medium bowl, combine flour, baking soda, and ginger. With spoon, stir flour mixture into cream mixture in 3 additions until dough is too stiff to stir, then knead with hands until flour is incorporated and dough is smooth.

2. Divide dough into 4 equal portions; flatten each into a disk to speed chilling. Wrap each disk well with plastic wrap and refrigerate at least 4 hours or overnight, until dough is firm enough to roll.

3. Grease and flour large cookie sheets (17-inch by 14-inch/43x36cm)

4. Roll out dough, 1 disk at a time on each cookie sheet to about 3/16-inch thickness. (Placing 3/16-inch dowels or rulers on either side of dough to use as a guide will help roll dough to uniform thickness.)

5. Trim excess dough from cookie sheet; wrap and reserve in refrigerator. Chill rolled dough on cookie sheet in refrigerator or freezer at least 10 minutes or until firm enough to cut easily.

6. Preheat oven to 300 degrees F (149C)

7. Use chilled rolled dough, floured poster board patterns, and sharp paring knife to cut all house pieces on cookie sheet, making sure to leave at least 1 1/4 inches between pieces because dough will expand slightly during baking. Wrap and reserve trimmings in refrigerator. Combine and use trimmings as necessary to complete house and other decorative pieces. Cut and bake large pieces and small pieces separately.

8. Chill for 10 minutes before baking if the dough seems really soft after you cut it. This will discourage too much spreading/warping of the shapes you cut.

9. Bake 25 to 30 minutes, until pieces are firm to the touch. Do not overbake; pieces will be too crisp to trim to proper size.

10. Remove cookie sheet from oven. While house pieces are still warm, place poster-board patterns on top and use them as guides to trim shapes to match if necessary. Cool pieces completely before attempting to assemble the house.

Simple Syrup: (really this should be called caramel- hard ball stage)
2 cups (400g) sugar

Place in a small saucepan and heat until just boiling and the sugar dissolves. Dredge or brush the edges of the pieces to glue them together. If the syrup crystallizes, remake it.

(Yes, no water). I recommend using half of this unless you have everything ready to go. It gets hard fast, so you have to work quickly. You can heat it up again and again but at some point it just gets too dark.)

I did use this to make windows. So when I place a candle inside the house (an electronic one), I can see the light shining through in amber tones.

For the royal icing:

I used the powdered meringue recipe on the back of the container. Worked like a charm. Ended up using that for my glue for the most part.


I had gone to the George Eastman Gingerbread House display for inspiration. Here is one of the neat GB "houses' that was there.

Wednesday, December 23, 2009

Chocolate Dipped Coffee Cookies


I was at the grocery store today and thought... hmmm... I better pick up some veggies for Christmas Eve. Then I thought, well, maybe I could wait until the day is closer, you know, Christmas Eve. I went ahead and bought some asparagus. I came home from the market and I am unloading my groceries and a moment of panic... Oh my God... tomorrow IS Christmas Eve. AHHHHHHHHHHHHHHH! My daughter, a very talkative three year old, keeps talking to me, in my panic. Ah! Um, honey Mommy is in time out, you can't talk to her right now. Why? Because I am about to have a melt down and I figure I will cut myself off at the pass and just put myself in timeout first.

Breathe... Lori... breathe... in and out. Do not deny the importance of this simple task... you know, breathing. Okay I am good. Thank you for allowing me this sound off.

Wow folks, where did the time go? I hope you all are ready.

Here is one of those cookies I just had to have this year. Coffee Cookies dipped in Chocolate. Fine Cooking had them in this months issue and I knew I had to make them. They are quite good. When you read the time for baking, it is not a mistake, they seriously take that long.

Chocolate Dipped Coffee Cookies
adapted from this recipe.

For the cookies:
8 oz. (1 cup) cold unsalted butter, cut into 1/2-inch pieces
1/2 cup granulated sugar
1/2 tsp. table salt
10 oz. (2-1/4 cups) unbleached all-purpose flour
2 Tbs. finely ground coffee, I used Starbucks, Italian Roast

For the dipping chocolate
9 oz. semisweet chocolate, chopped
1 Tbs. vegetable shortening

Line two baking sheets with parchment. Combine the butter, sugar, and salt in a stand mixer bowl (use the paddle attachment) or a large mixing bowl. Mix on low speed until the butter combines with the sugar, 1 to 2 minutes. Add the flour and ground espresso and mix on low speed, scraping the bowl frequently, until the dough has just about pulled together, about 3 minutes; don't overmix.

On a lightly floured surface, roll the dough to about 1/4 inch thick. Aim for a uniform thickness to ensure even baking. Using a round cookie cutter (or other), cut out shapes. Press the scraps together, roll them out, and cut out more cookies. If the dough becomes sticky, refrigerate it briefly. Arrange the cookies on two parchment-lined baking sheets and refrigerate until chilled, at least 20 minutes.

Position oven racks in the upper and lower thirds of the oven and heat the oven to 300° F. Bake the cookies until golden on the bottom and edges and pale to golden on top, 30 minutes to 1 hour. (After 15 minutes, swap the position of the baking sheets and rotate them 180 degrees for even baking.) If the cookies are done before 30 minutes, reduce the oven temperature to 275° F for the remaining batches; if they take longer than 1 hour, increase the temperature to 325° F.

Tuesday, December 22, 2009

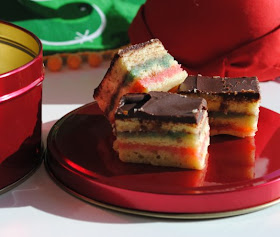
Rainbow Cookies

My husband says to me why are you making those- is that some kinda challenge? I said, yup, its my challenge to myself. I always wanted to make them and so I am making them.

It's funny because Rainbow cookies (also known as Neapolitan cookies), from what I understand are a very popular cookie in the Long Island region of NY. Very few Italians make them around here. Or maybe I just don't know the right Italians.

These cookies are worthy every bit of the effort that you make. You bite into one and the ones at the bakery are dwarfed in comparison. Buttery almond creaminess offset by tangy sweet apricot jam and raspberry jam, then topped off with chocolate. Delicious.


Rainbow Cookies
adapted from this recipe by Sherry Yard, Desserts by the Yard

For the cake:12 ounces almond paste
1 1/2 cups sugar
1 1/2 pounds butter (6 sticks) softened and cut into 1/2 inch cubes
6 large eggs, separated
3/4 cups almond flour
3 cups unbleached ap flour
red food coloring
green food coloring

1 recipe simple syrup (place one cup of sugar and one cup of water in a small saucepan and bring to a boil, stir to dissolve sugar and allow to cool.)
3/4 cup apricot jam
3/4 cup raspberry jam

For chocolate glaze:
6 ounces bittersweet chocolate
3 ounces butter
5 tablespoons corn syrup
1 1/2 tablespoons Grand Marnier

Preheat oven to 325 degrees.

Spray 3 12x17 inch half sheet pans with pan spray and line with parchment. (The spray will keep the paper from sliding when you are spreading the thick batter.) Lightly spray the parchment.

Place the almond paste in a food processor and blend for a minute to warm it up a little. Add the sugar and pulse until the mixture has the consistency of wet sand. Add butter one stick at a time until incorporated. Add yolks, one at a time. Then add almond flour and pulse just until blended. Transfer the batter to a large bowl and add the ap flour - just until incorporated.

Place the egg whites in the bowl and beat until soft peaks form. Pour egg whites over top of the batter in a large bowl, fold in to the batter.

At this point you should separate the batter into three equal portions. Stir 1-2 drops of red paste food coloring into one portion, and 1-2 drops of green food coloring into another. One third of the batter should be bright pink and one third light green. The third one should be yellow for the standard colors. (Silly me totally forgot this part all together, so I added the green color to one portion of the simple syrup and the red color to the other portion of simple syrup. Hence my funky Rainbow cookies.) UPDATE: new pics included with the right way to do the colors.

Scrape all of one colored batter onto one sheet pan and spread it evenly, pushing the batter with the spatula to the outer edges of the pan, making sure they are at least 1/4 inch thick. Slide your finger or a damp paper towel around the inner edge of the pan to remove any excess batter. Repeat with the remaining 2 portions of batter.

Place the pans in the oven and bake for 10 minutes. Rotate the top and bottom pans from top to bottom and turn them around. Turn the middle pan around. Bake another 10 minutes, or until the cakes are dry and firm to the touch. They should not brown. Allow the cakes to cool in the baking sheets for 10 minutes.

When the cakes have cooled, place another empty half sheet pan in front of you upside down. Spray the pan with pan spray and place a layer of parchment paper on it with several inches of overhang. Invert the white or yellow cake onto the parchment covered upside down pan, and peel the parchment off the top of the cake.

Brush the cake liberally with simple syrup and spread with the apricot jam using an offset spatula. Repeat this process with the pink layer, brushing it with simple syrup and spreading it with the raspberry jam. Top with the green layer and brush it liberally with simple syrup. Trim any crumbling edges and remove the loose crumbs.

Use the parchment overhang to slide the cake off the pan and place in one of the now-empty half sheet pans. Cover the cake tightly with plastic or wax paper and place one of the other empty pans on top. Chill for two hours. At this point, the cake can also be wrapped airtight and stored in the freezer for three to four weeks.

Make the chocolate glaze:
Combine the chocolate and butter in a heatproof bowl and microwave on low power until the butter is melted. Stir to melt the chocolate. Stir in the corn syrup and the Grand Marnier. The glaze should be smooth, shiny and pour-able. (It will cool and set when it is poured on the refrigerated cake.)

Remove the cake from the refrigerator and unwrap it. Pour the glaze over the cake and smooth out with an offset spatula. Add designs if desired with a fork. Refrigerate the cake again for at least thirty minutes or until the glaze is completely set.

To cut the cake, place it on a flat surface and use a serrated knife, dip in warm water and wipe dry as needed. Cut only in one direction - being careful as you pull the knife up through the cake so that the glaze does not peel off the cake.

Saturday, December 19, 2009

Banana Butternut Bread

You know when you are so busy you forget things. At least I do. This is embarassing but I can not remember if I posted this before. I did searches to try and find it on my blog. I don't think I posted this recipe, if I did I apologize for the duplication. If I didnt I bring you the following, delicious recipe.

With company coming I like to have some quick breads around for snacking or for breakfast. It's nice to have a slice with some fresh fruit in the morning. I was thinking banana bread since I had some overly ripe bananas to use up. But I didnt have quite enough. I remembered I had some roasted butternut squash in the fridge. I roasted up about 8 cups of it the other day and have been using it in various dishes that I have been making. It has been very convenient to reach in the fridge and grab some of the squash- already carmelized from the roasting process. Nice and sweet and handy. I decided to throw some of that into the bread. I mashed it up a bit but left it a little chunky on purpose.

Banana Butternut Bread

2 cups all-purpose flour
1 teaspoon baking soda
1/4 teaspoon salt
1/2 cup butter
3/4 cup brown sugar
2 eggs, beaten
1 cup mashed overripe banana
1 1/2 cup butternut squash that has been cubed and roasted
1 teaspoon vanilla extract
1 teaspoon cinnamon
1/2 cup chocolate chips

Preheat oven to 350F. Cream butter and brown sugar together in a large bowl until light and fluffy. Add in beaten eggs until combined and then mashed banana and vanilla. In a seperate bowl or large measuring cup, combine dry ingredients: flour, salt, baking soda and cinnamon. Stir into wet ingredients until just combined. Add chocolate chips and fold into the batter. Pour into loaf pans and bake for about an hour.

Tuesday, December 15, 2009

I've Been Yogued


Any excuse to say that word. Yogued... like Vogue, only slightly fermented... I also like onomonapea and peppadew... Any excuse to say those words.

But I digress. You see for over a year now, more like five or ten years, I have been serious about making my own yogurt. I actually owned a yogurt maker. It was a long plastic covered contraption with six ceramic containers in it. It sat in my pantry for a looong time. I got rid of it. I saved the containers because they are reusable and have nice little covers. But I gave up. It all sounded like too much of a hassle. Until now. I found this post at A Year of Slow Cooking. I was hooked. I even bought a crock pot (15 bucks on sale, whew heeew). Why? because it had a warm function and I wanted to make sure it would keep the heat below 140F which is optimal because the good bacteria can be killed in the yogurt. I also liked this particular crock pot because it fits on my counter and I don't have to drag it in and out of the pantry. Love that! It was worth it to me you see because my husband goes through copious amounts of yogurt.

Now, crockpot lady does hers solely in the crockpot. I wanted to speed up the process a little. I put 2 quarts of 2% milk into a stock pot. I heated it on medium until the temperature reached about 185F. I turned it off and let it cool. I added the starter that my husbands friend "V" generously gave us (from India) after it had cooled. I had left the starter out on the counter to bring it to room temperature before adding it in. I also stirred in a 1/2 cup powdered milk. From what I have read, 2 tablespoons to a 1/4 cup per quart of powdered milk will help to gel the yogurt a bit more. European yogurt I guess tends to be on the runny side. American yogurt is more firm. I actually will eat it either way but prefer it more on the thicker side.
I put the crock pot on the previous day and took the temperature of the water with an instant read thermometer to make sure it was under 140F. After four hours of being on it was at 120F. So I was pretty sure it would not get too hot. I poured warm water into the crockpot and turned the dial to warm. I put my pint jars into their cozy little hot tub. I covered it and left it on for about 7 1/2 hours. I pulled out one of the jars and looked at the liquid. It had gelled. I consider that a success. Wahoo!
Here are the "Cliff Notes" version of what I did:

1. Heated 2 quarts of 2% milk in stock pot until the temperature reached 185F.
2. Brought my starter to room temperature.
3. After milk cooled down I added the 1/2 cup of starter & 1/2 cup powdered milk.
4. Poured that liquid into 4 pint jars and put lids on top.
5. Turned on my crockpot to warm and added warm tap water.
6. Placed the pint jars into the warm water bath in the crockpot and covered it.
7. It sat in the warm water bath for about 7 to 8 hours.
8. Turned the crockpot off, removed the pints and transferred them to the fridge.
9. In the morning I opened one, spooned it out and added a tablespoon of my canned cherry jelly. I enjoyed some cherry flavored yogurt for a fraction of the cost.

Notes:

You can use a good quality yogurt with all the good bacteria in it for your starter. Or you can actually pick up a yogurt starter at a Health Food store.

I don't know if it was the starter or the milk powder but the yogurt is a bit of a different flavor than the store bought one. I imagine I will get used to it and then hate the store bought one- thinking it too bland. Of course slathered in jelly, I didnt notice anymore.*

*Update- I found out it was the dry milk- I tasted it on its own and it was disgusting. It's old. Goodness time flies.

Monday, December 14, 2009

Daring Cooks: Salmon En Croute

This months Daring Cooks challenge was a choice of Beef Wellington or Salmon en Croute. So many people have been complaining that their have been a lot of fish recipes. Understandably so because there has. For us fish people that is NO problem. Besides I have already done Beef Wellington, which I am actually planning to make again on New Years Day. So for me it was an obvious choice.

My review. This is a really elegant, quick recipe that you can pull together in a short period of time to wow your dinner guests. I highly recommend this if you have company and you know they enjoy salmon. Wonderful taste.

Note:
The 2009 Daring Cooks challenge was hosted by Simone of Junglefrog Cooking. Simone chose Salmon en Croute (or alternative recipes for Beef Wellington or Vegetable en Croute) from Good Food Online.

Salmon en croute
Ingredients
creamcheese 6 ounces
spinach 16 ounces
Puff Pastry 1 sheet
Salmon fillet (skinless) 16 ounces
egg - 1 medium sized

I added:
the juice of half of a lemon
1 tablespoon of dill weed
2 cloves of garlic, finely minced

Directions:
1.Heat the oven to 400 F. Put the cream cheese in a food processor with the spinach and whizz the lot until you have a creamy green puree. Season well.
2. Roll the pastry out so you can wrap the salmon in it completely (approx. 2-3 mm thick) and lay it on a buttered or oiled baking sheet (it will hang over the edges). Put the salmon in the middle. If it has a thinner tail end, tuck it under. Spoon half of the spinach mixture onto the salmon. (I sliced my salmon in equal parts and put the mixture between teh two fillets, laying the thick end over the thin end and the thin end over the thick end, so the parcel ended up being a uniform thickness.) Now fold the pastry over into a neat parcel (the join will be at the top, so trim the edge neatly), making sure you don’t have any thick lumps of pastry as these won’t cook through properly. Trim off any excess as you need to. Make 3 neat cuts in the pastry to allow steam to escape and make some decorations with the off-cuts to disguise the join if you like. Brush with the egg glaze.

3. Bake for 30 minutes or until the pastry is crisp and browned. To test wether the salmon is cooked, push a sharp knife through one of the cuts into the flesh, wait for 3 seconds then test it against the inside of your wrist; if it is hot, the salmon is cooked. Serve with the rest of the watercress puree as a sauce.

Shortcrust pastry

Ingredients:
450 gr (15.8 ounces or 3.2 cups ) of plain all purpose flour
200 gr ( 7 ounce) cold butter
pinch of salt

Sift the flour into a large bowl, add the butter and rub in with your fingertips until the mixture resembles fine breadcrumbs. If you have a food processor you can use that.
Stir in the salt, then add 2-3 tbsp of water and mix to a firm dough. Knead the dough briefly and gently on a floured surface. Wrap in cling film and chill while preparing the filling.

For best results make sure the butter is very cold.


Friday, December 11, 2009

Olan Stew

Almost a year ago we had my husbands friend, 'V' over from work. He had recently returned from India for his sisters wedding. He showed us pictures from her wedding and I was truly amazed and mystified with all the colors and tradition. Very beautiful. Now, over a year later, he and his wife are settling into their new life together. Last year I had made for 'V' Olan stew. I never posted a pic because my dear husband had eaten it all before I had a chance to get a pic. (ugh!) Not this year. I put my 'do not eat' sign on it so I could photograph it. We just had it for dinner the other night, just because, just me and DH. The kids had Mac and Cheese and we ate my nouveau South Indian, Olan stew.

" Olan is an essential dish in the traditional Kerala Onam Sadya and even for wedding sadya." (Edible Garden) I will share with you a little of what I learned. By no means do I claim to have knowledge about this subject, so for sure don't quote me, I will just share some highlights that I have learned and some quotes from other people to give you the gist of some of the beauty that is the Kerala wedding.

When women are about to marry they have their hands painted for the ceremony. It takes quite a while to dry. According to our friends new wife 'T', the tradition was originally Muslim, but has long been adopted by other cultures including those in Southern India. If you want to see some amazingly beautiful hands, click here. This image is borrowed from the Florida Department of Health.

"Henna is typically used in Hindu and Muslim celebrations. There are also other myths surrounding that reddish-brown tattoo. The most popular beliefs are the deeper the color, the stronger the bond between bride and mother-in-law. [With henna on her hands], the bride doesn’t have to do any household work—she is pampered and cared for. Every family has different oral traditions about the meaning of henna, but the housework exemption is important in that traditionally the bride goes to live with her in-laws after marriage. This exemption from housework allows her to bond with her new husband and family. This tradition is also followed when a woman is hennaed during the childbirth time, to allow her time to bond with her infant child." (Indian Bride SA, The Meaning of Mehndi)

"The traditional Hindu wedding is a deeply meaningful and symbolic combination of rituals and traditions. It is a ceremony that is about 4000 years old. Each phase of the ceremony has a symbolic, philosophical, and spiritual meaning. The ceremony not only to joins the souls of the bride and groom, but also creates a strong tie between two families. The ceremony is traditionally performed in Sanskrit, which is the language of ancient India and Hinduism. Today the ceremony will be performed both in Sanskrit and English. " (Devasthanam)

Olan Stew
adapted from this recipe.

1/2 cup black eyed peas or you could use a can of garbanzo beans
1 1/2 cups amber squash, skinned and diced
1 can lite coconut milk
5 curry leaves
salt to taste
1 clove of garlic sliced
*you can add chilis in your soup, I add mine to my bowl because I like it spicy

Cook the garbanzo beans in 2 cups of water till soft. Drain and set aside.

In a soup pot, cook squash with a 1/2 cup water, lid on, until soft. When the squash becomes tender add coconut milk and curry leaves and simmer for a few minutes till the soup thickens. Serve soup with rice.

Wednesday, December 9, 2009

New Age Vichyssoise


Some debate goes on about the origin of vicchysoise but I think its really about who popularized it. My Mother said she had that soup all the while growing up. Daughter to Polish immigrants, I think she was as far from French cuisine as you can get. The only difference between the kind of potato soup she was raised on and this one, is temperature. She said her family and the farm hands would eat the hot soup in the summer sitting under a very large tree outback. They would cool off from the evaporation process of sweating from eating hot soup on a summer day.

New Age Vichyssoise
This recipe depends on a nice broth to make it super tastey.

1 head of cauliflower, broken up into pieces
3 potatoes
2 quarts of some amazing broth, like some rich turkey broth
2 leeks or 1 onion, minced
2 cloves of garlic minced
1 cup of milk, the creamier the better
1 tablespoon butter
1 tablespoon oil
s and p to taste

Chopped leeks or onion. Saute leeks in oil/butter mix in a large soup pot. When translucent add stock and cauliflower. Chop potatoes and add to the mix. Mince garlic and add this as well. Season with salt and pepper to taste. Blend with an immersion blender or a regular blender. Add in milk. Do not boil.

Monday, December 7, 2009

Gingerbread Waffles

My husband has been taking care of pancakes here for a couple weeks now. Ever since his star oatmeal pancakes graced our table. But this past Sunday, I felt a change was in order. With a little pumpkin puree left over in the fridge I thought it might be good to try out this recipe. While I am not a big fan of RR, I do find a recipe here and there that is just irresistable. This is one. However, next time I might beat the egg whites seperately to give them an extra little lift.

Gingerbread Waffles
adapted from Rachel Ray's recipe here.

3 cups all-purpose flour
4 teaspoons baking powder
2 teaspoons ground cinnamon
2 teaspoons ground ginger
1/2 teaspoon freshly grated nutmeg
1/2 teaspoon salt
3 large eggs
2/3 cup packed dark brown sugar
1 cup canned pumpkin puree
1 1/4 cups buttermilk
1/2 cup molasses
1/2 cup (1 stick) melted butter, plus some to butter the iron

Preheat waffle iron. In a large bowl combine flour, baking powder, cinnamon, ginger, nutmeg and salt. In a medium bowl, beat eggs and brown sugar until fluffy, then beat in pumpkin, milk, molasses and melted butter. Stir the wet into dry until just moist. Do not overstir the waffle batter. Brush the iron with a little melted butter and cook waffles. Serve with toppings of choice.

*I drizzled mine with a sugar glaze. I just mixed a little confectioners sugar with milk.

Update: You know, I have to tell you because I believe in truth in advertising, these babies are jammed with calories. I made 14 pancakes and they roughly work out to 250 calories per waffle. Yikes! So one is okay-two might be okay if you are a man. But, oh my gosh, by golly (can you hear the jingle?) don't go eating more than that unless you want to consume your caloric intake in one meal.

Friday, December 4, 2009

HARIRA

It was more soupy originally but the pasta sucked all the liquid out by the next day. So add your pasta as needed if you don't want this to happen.

I have been meaning to rant about something for days now. A couple of weeks ago I saw an article in the NY Times written by Kimball. I was directed by this Cast Iron Dude post. I must say with all due respect to Mr. Christopher Kimball and of course my beloved Gourmet that I seriously doubt the magazine was killed by bloggers and Tweeters. Who knows what it was, and I really don't have the knowledge to figure that out but my rant here is about Mr. Kimball's seeming snootery.

read this:
"The shuttering of Gourmet reminds us that in a click-or-die advertising marketplace, one ruled by a million instant pundits, where an anonymous Twitter comment might be seen to pack more resonance and useful content than an article that reflects a lifetime of experience, experts are not created from the top down but from the bottom up. They can no longer be coronated; their voices have to be deemed essential to the lives of their customers. That leaves, I think, little room for the thoughtful, considered editorial with which Gourmet delighted its readers for almost seven decades." (NY Times, October 7. 2009; Kimball).

I beg to differ. I think people who are somewhat intelligent will understand that you should always seek a professionals advice when a professional is needed. Certainly I will always differ to experts in the field when I am inquisitive about something. There will always be experts that are created from the bottom up. Thats just how life is. And besides some people have an uncanny natural ability or know how to put themselves in those places. Although the articles and editorials from Gourmet are valued, so are the millions of voices out there in the blogging world. Don't we all learn from each other? Isn't it out of the mouths of babes that some intelligent antidotes and profound words are formed?

I understand that journalism is feeling the effects of a changing environment brought about by the web but most professions go through metamorphosis at some point or another. The statement smacks of insecurity about the profession of the food writer. I understand that, but don't put down others in the process only to elevate yourself.

Okay, I am done with my rant. On to the meat and potatoes of this blog... I mean the meat and beans.


TURKEY HARIRA
adapted from Martha- here.

2 tablespoons extra-virgin olive oil
1 medium onion, finely chopped
1/2 cup dried chickpeas, soaked in water overnight
8 cups homemade turkey stock
4 cups water
3 garlic cloves, minced
1/4 cup finely chopped fresh cilantro
salt to taste, depending on your stock
4 celery stalks, finely chopped
4 ripe tomatoes, peeled and chopped
1 cup yellow lentils, rinsed
1 tablespoon tomato paste
1 tablespoon fresh lemon juice
1 cinnamon stick
1/2 teaspoon sweet paprika
1/2 teaspoon turmeric
1/2 teaspoon ground ginger
1/2 teaspoon ground coriander
1/4 teaspoon ground nutmeg
1/4 teaspoon freshly ground pepper
1/8 teaspoon ground cloves
6 ounces orzo or some small thin pasta
1/2 cup chopped, pitted dates
1/4 cup coarsely chopped fresh flat-leaf parsley, plus whole leaves for garnish
1 lemon, cut into wedges

1. Heat oil in a Dutch oven over medium heat. Add onion, and cook 5 minutes. Add chickpeas, stock, and water, and simmer until tender, about 45 minutes.
2. Add garlic, celery, tomatoes, lentils, tomato paste, lemon juice, and spices to the pot. Simmer until lentils are tender, 30 to 40 minutes.
3. Add pasta and dates, and cook, stirring occasionally, until pasta is al dente, about 10 minutes. Stir in coarsely chopped cilantro and parsley. Garnish with parsley leaves, and serve with lemon wedges.

Wednesday, December 2, 2009

Pumpkin Tiramisu


Over Thanksgiving I wanted to make soemthing nontraditional. I had some mascarpone and some lady fingers hanging out in my pantry so I decided to make some pumpkin tiramisu. I wasn't completely sold on the final product but my sister in law and my husband liked it. I think it was a texture thing for me. Next time I will make it a little differently.

Now don't get all technical on me, I know this isn't really tiramisu- its missing a lot of components of tiramisu but it's my interpretation.

I wanted to let you know that Sugared Ellipses is having a Penzey Spice giveaway. How nice is that? And what perfect timing when everyone is baking, baking and of course baking! So go on now and check out the giveaway.

Pumpkin Tiramisu
Lori's Lipsmacking Goodness Original

2 cups pureed pumpkin
16 ounces mascarpone, room temp.
1 cup brown sugar
1 teaspoon vanilla
1 teaspoon cinnamon
1/4 cup Tuaca (Italian liquor)
1 cup simple syrup
1/2 cup praline (I used hazelnut but I bet pecan would be outstanding)
16 plus Ladyfingers

Make simple syrup (1 cup water and 1 cup sugar, boiled and cooled) and add Tuaca to syrup. Place a single layer of ladyfingers in a 9 x 9. Drizzle half of syrup mixture over the ladyfingers.

In a bowl fold the pumpkin into the mascarpone. Stir in cinnamon, vanilla and brown sugar. Slather half of the mixture down on the layer of soaked ladyfingers.

Place another layer of ladyfingers over the pumpkin mixture. Slather the remaining pumpkin mixture of the ladyfingers. Sprinkle with praline. Chill overnight.

Serve with a dollop of whipped cream or not- "Uppa tah you" (as my Nonna use to say)


Bench notes:
1. Next time I would use slightly less syrup (I already reduced it a little in this recipe). Uppa tah you...

2. I may even fold in some whipped heavy cream to the mixture.

3. Not have such a full stomach from Thanksgiving so I could actually enjoy it.

Tuesday, December 1, 2009

Recipes to Rival: Rye Bread

I have been on a search for a recipe that tastes like the pumpernickel you buy in the store. I love it. And those yummy pumpernickel pretzels are really good as well. So I was excited to see Temperance's, High on the Hog, recipe for rye for this month's Recipes to Rival Challenge- looking a lot like pumpernickel. I don't know maybe it was because I used Blackstrap Molasses. Maybe the recipe is not the same but I am sorry to say that this is not what I was looking for in pumpernickel. So if there is someone out there saying to yourself as you read this, "I've got a pumpernickel recipe for you." Please, please, please send it to me.

One of the highlights of this months recipe was finding out that adding wheat germ, milk powder and soy flour to some bread will up the nurtitional quotient quite a bit. "Back in the 1930's, a Cornell University professor named Clive McCay developed a bread recipe named Cornell Bread. It makes a complete protein that rats can live on exclusively. (The only reason that humans can't live on it exclusively is that it lacks vitamin C, which rats don't need.) The Cornell formula to enrich bread consists of 1 tablespoon each soy flour and nonfat milk powder plus 1 teaspoon wheat germ for each cup of flour used in a bread recipe. These enrichments are placed in the bottom of the measuring cup before the flour is spooned in." It's called McCay's Miracle Loaf.

So what exactly is the difference between rye and pumpernickel. I have read different opinions in baking books and on the web. I did a little research and found this information. "Light rye bread is made with the white rye flour made by grinding the rye berry’s center endosperm. The ground flour will not contain any of the outer seed coat, the bran or the germ so it will be fairly light in color as well as the bread made from it. For the dark rye bread, there are two ways that it can be made. The first one is exactly the way light rye is made but with coloring and some flavoring added like cocoa powder and molasses. The second way, which also seems to be more agreed upon as authentic, is where a different grind of rye flour than light is used. The flour is milled from the rye berry’s endosperm which is the part that contains more coloring pigments. The flour is usually ground more coarsely too... As for the pumpernickel bread, it is made from a kind of flour known as pumpernickel flour made from coarsely ground rye berries. In certain particular recipes, crumbs from other rye breads can be added to the pumpernickel bread dough. Pumpernickel bread loaves are usually dense and dark with strong flavoring. The flavoring is due to the fact that pumpernickel bread is usually steam baked at a low heat for over two hours, during which time flavors are formed in the bread and the natural sugar in the rye will darken and sweeten because of the long slow baking." (Click here for article. Source: Difference Between.net)

Old World Rye
A World of Breads by Dolores Casella, 1966
what I used in parenthesis

2 cups rye flour
1/4 cup (black) cocoa powder
2 T yeast
1 1/2 cups warm water
1/2 cup (black strap) molasses
2 tsp (kosher) salt
2 T (ground) caraway seed
2 T butter
2 1/2 cups white flour or whole wheat flour

Combine the rye flour and cocoa. do not sift.
Dissolve the yeast in 1/2 cup warm water.
Mix molasses, 1 cup warm water, salt, and caraway seed in large mixing bowl.
Add the rye/cocoa mix, the proofed yeast, the butter and 1 cup white flour or whole wheat flour.
Knead until the dough is smooth.
Spread the remaining flour on a breadboard and knead it into the dough
Add more flour if necessary to make a firm dough that is smooth and elastic.

Place in buttered bowl and cover. Allow to rise until double (about 2 hours).
Punch dough down, shape into a round loaf and place on a buttered cookie sheet that has been sprinkled with cornmeal.
Let rise about 50 minutes.
Bake at 375 for 35 to 40 minutes.

Bench Notes (I love saying that- it makes me feel so professional):

1. If I were to try this recipe again I would use regular molasses.
2. I would use the black cocoa again because it gives the bread a nice color. And since I have some of it and I am not quite sure what to do with it besides make cholocate wafer cookies, I think I will use it for pumpernickel.