Pages

Wednesday, April 29, 2009

Whopper in Progress

I saw this recipe for a cookie called a whopper. The original recipe began here. I put it all together and was excited about a healthy cookie that was also gluten free. I could share it with others if it was a good one. But alas, it was tastey, but extremely crumbly. In the end I think I figured out why.

Here's the progression.

First batch of cookies were crumbly so I added 1 cup of flour to the remaining dough.

They had better texture but still were crumbly.

Then it dawned on me that the melted butter may have had something to do with it. (If you are gluten free you may want to make this recipe without the flour because I think the butter was the true culprit.)

This time they came out WAY better. Tastey, pretty healthy, and most importantly- cohesive. ahhhh.

Whopper (adjusted)

1 cup butter
1 1/4 cup brown sugar
3/4 white sugar
3 eggs, room temp
2 teaspoons vanilla
2 cups of Jif peanut butter
4 cups Old Fashioned Oats
2 cups oat bran
2 teaspoons baking soda
1 1/2 cups raisins
1 (12 oz) package chocolate chips

Preheat oven to 350F. Cream butter and sugars together. Add peanut butter, mix well. Add eggs one at a time. Combine dry ingredients in a bowl and add to creamed mixture. Finally add raisins and chocolate chips. Place on greased baking sheet in large balls, flatten a little. Bake for fifteen minutes.

I am sending these yummy whopper of a cookie over to Click for their event. Click Cookies. Click on the announcement below to join in.

Tuesday, April 28, 2009

MOIST YOGURT CAKE


No red food dye in this food here. Ah, but you were wondering about my article that I told you about. You can click here to read it. I had a lot of fun writing the article and learning so much from it.

Above is one of the most moist cakes you'll ever have grace your palette. It's wonderfully flavored and can be paired with almost anything. I did a raspberry glaze here. I doubled the recipe here and made two loaves, one for us and one for the freezer for company. I like to do this, I call it my fast food. I also like to do this when I am baking bread or crackers or something like that, particularly if it has a lot of little ingredients. Like a half of a cup of this and this and this and that. What I do is dole out the dry ingredients twice, once in a container and the other in the bowl for that day. I store the container one until I am ready to make the recipe again. Those are my prepackaged mixes. It makes it easy when I only have to add eggs and oil or something like that.

INCREDIBLY MOIST RASPBERRY YOGURT CAKE

1 1/2 cups flour
1 cup sugar
1/2 teaspoon salt
2 teaspoons baking powder
3 eggs
1 cup plain yogurt
1/2 cup corn oil or canola oil
1 teaspoon vanilla
zest of 1 lemon

topping:
1/2 cup raspberry jam
1/4 cup plain yogurt


(Do not bake in a glass loaf pan.) Spray a 9 1/2 by 5 1/2 inch loaf pan with nonstick cooking spray. Preheat the oven to 350F.

Whisk together: oil, yogurt, zest, vanilla, eggs and sugar. In a seperate large bowl combine dry ingredients. Pour the wet ingredients into the dry and stir just enough to combine completely.

Bake in preheated oven for about 50 minutes. In a small saucepan melt jam. Remove from heat and stir in yogurt. Remove cake from the oven and let cool five minutes. Remove from pan and pour jam yogurt mixture over cake.

Monday, April 27, 2009

Daring Bakers: Cheesecake


The April 2009 challenge is hosted by Jenny from Jenny Bakes. She has chosen Abbey's Infamous Cheesecake as the challenge.


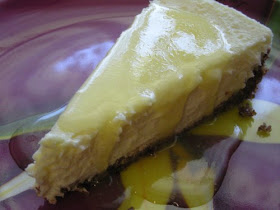
Having made cheesecake many times I am doubtful I would have made this recipe. This is why Daring Bakers is so cool because I tried this recipe, and it was one of the most creamiest cheesecakes I have ever had. I loved it.

I did one in a spring form, one in the pan as she suggests, a foil throw away, and the mini muffin tin. They were all creamy and delicious. Even without the waterbath for the spring form one and the mini muffin one it was still dreamy and creamy.

I took it to my Aunt's house for Easter dinner. My Aunt has celiac disease so I made the cheesecake crusts out of nuts. I made one, the one with rum, from pecan meal and the other from almond meal. I just mixed about a cup and half of nut flour with about two tablespoons of sugar and a 1/4 cup of melted butter.

Everyone really liked the passionfruit one. I did too but the rum one was my favorite.


I just don't know why it says infamous in the title, really it should be famous like Junior's cheesecake.

Abbey's Infamous Cheesecake:

crust:

2 cups / 180 g graham cracker crumbs
1 stick / 4 oz butter, melted 2 tbsp. / 24 g sugar
1 tsp. vanilla extract

*see above for my crust variation.

cheesecake:

3 sticks of cream cheese, 8 oz each (total of 24 oz) room temperature

1 cup / 210 g sugar

3 large eggs

1 cup / 8 oz heavy cream

1 tbsp. lemon juice
1 tbsp. vanilla extract (or the innards of a vanilla bean)

1 tbsp liqueur, optional, but choose what will work well with your cheesecake

*I omitted the lemon juice, vanilla and liquer to add 3 tablespoons of passionfruit pulp, unsweetened.
for the rum one I omitted those same things and added 3 tablespoons of rum

DIRECTIONS:

1. Preheat oven to 350 degrees F (Gas Mark 4 = 180C = Moderate heat). Begin to boil a large pot of water for the water bath.
2. Mix together the crust ingredients and press into your preferred pan. You can press the crust just into the bottom, or up the sides of the pan too - baker's choice. Set crust aside.

3. Combine cream cheese and sugar in the bowl of a stand-mixer (or in a large bowl if using a hand-mixer) and cream together until smooth. Add eggs, one at a time, fully incorporating each before adding the next. Make sure to scrape down the bowl in between each egg. Add heavy cream, vanilla, lemon juice, and alcohol and blend until smooth and creamy.

4. Pour batter into prepared crust and tap the pan on the counter a few times to bring all air bubbles to the surface. Place pan into a larger pan and pour boiling water into the larger pan until halfway up the side of the cheesecake pan. If cheesecake pan is not airtight, cover bottom securely with foil before adding water.

5. Bake 45 to 55 minutes, until it is almost done - this can be hard to judge, but you're looking for the cake to hold together, but still have a lot of jiggle to it in the center. You don't want it to be completely firm at this stage. Close the oven door, turn the heat off, and let rest in the cooling oven for one hour. This lets the cake finish cooking and cool down gently enough so that it won't crack on the top. After one hour, remove cheesecake from oven and lift carefully out of water bath. Let it finish cooling on the counter, and then cover and put in the fridge to chill. Once fully chilled, it is ready to serve. Pan note: The creator of this recipe used to use a springform pan, but no matter how well she wrapped the thing in tin foil, water would always seep in and make the crust soggy. Now she uses one of those 1-use foil "casserole" shaped pans from the grocery store. They're 8 or 9 inches wide and really deep, and best of all, water-tight. When it comes time to serve, just cut the foil away.

Hot Buttered Rum Sauce

1/2 cup butter
2 tablespoons rum
1 cup sugar
1/2 cup light cream

In a small saucepan heat all ingredients together until sugar is melted. Let boil for about five minutes. Remove from heat and let cool slightly. Spoon over cheesecake.


Sunday, April 26, 2009

Some words on loss and HAMburgers


The past couple months have been a roller coaster ride for one of my dear friends. She lost her brother-in-law suddenly and her Mother suddenly. Just how exactly do you move through that pain? My heart goes out to her and her family. I reach out my hands to her and as I do I think to myself: We are all there where you are, whether it is in this moment or in another moment but we all walk that road. It is of course part of our humanity. I never know what to say, so for the most part I don't say anything. What words can console? Nothing really. There is nothing to be said and words seems so trite. I make myself available and help in whatever way I can but yet I still feel so helpless and unhelpful. I say prayers and although I am not a religious person, I try to focus my love on that person, hoping somehow that can be helpful to them. That is about the best I can do.

I bring this up because I stopped by Crescent's blog, "Nothing is wasted on the writer", which I just adore and my only regret is that there is not something written daily. I love to read her words. So heartfelt and true. So eloquent and captivating. You can read what I just read here. And the post before it is exceptional as well.

I made these HAMburgers a couple weeks ago adn we really enjoyed them. They crumble easily, be patient and work delicately with the mixture and there will be some cohesiveness.

HAMburgers with Peas

2 cups chopped ham, very fine chop
1 teaspoon mustard
2 eggs
1/2 cup bread crumbs
1 medium onion, chopped and sauteed
1 clove garlic, minced and sauteed
1 tablespoon olive oil plus more for frying
1/2 cup peas, crushed a little, leaving some whole
pepper to taste

Combine ham, mustard, eggs and bread crumbs in a bowl. Set aside. Saute onion and garlic until softened and cool a bit. Add the onions and garlic to the ham mixture. Form into patties and fry in oil. If you want to use less oil you can. You can finish these burgers in the oven at 350F to complete the cooking process.

Saturday, April 25, 2009

LEMONY LENTIL SALAD with GREEK DRESSING

Well, we are off to do our part for the community/environment. We are out picking trash up. There was an overwhelming response in our community last year. Here's hoping that today there will be a grand outpouring of do-gooders out to clean up the roadside. It's small but it is something. The most important thing we hope to accomplish is to give our children a sense of community and responsibility to that community.

This salad whips up quick and it is virtually a veggie rainbow in a bowl. The flavor packs a great, refreshing punch. I like my veggies to outnumber my lentils because I don't like it too starchy.


Restaurant Style Greek Dressing

1/2 cup olive oil
1/4 cup lemon juice
1/4 cup red wine vinegar
1 teaspoon garlic powder
1 teaspoon onion powder
2 teaspoons dried oregano
1 teaspoon kosher salt

Whisk all ingredients together in a bowl.


LEMONY LENTIL SALAD

1/4 cup lemon juice
3-4 tablespoons of Greek Dressing
1 cup coooked lentils
1 1/2 cups carrots, chopped
4 green onions, sliced
1/2 cup radish, chopped
1/2 cup parsley, chopped

Boil lentils in pot until nearly tender, add carrots. Cook until carrots are crisp tender. Drain lentils and carrots to cool. Empty them into a bowl and combine with the remainder of the vegetables. Pour dressing and lemon juice over the salad. Combine thoroughly. Add salt and pepper to taste.

Thursday, April 23, 2009

And you could smell us a mile away.


I have so been wanting a kind of a Sopa de Ajo but I just couldnt find what I was looking for. You know that "Necessity is the Mother of Invention". So a little of this and a little of that and I got exactly what I wanted. My husband, the garlic officianado, took care of any trace of leftovers. There wasn't a drop left. And he had the smell to prove it. Back off Jack.


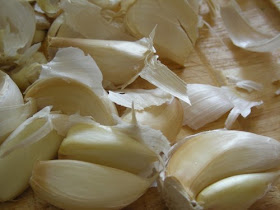
I roasted five heads of garlic for this soup so if garlic scares you, don't read any farther. If colds and viruses have been making there way around your house, this is the medicine you have been looking for. Natures antibiotic. Of course it will keep EVERYONE else away as well.

Sopa de Ajo, My Way

5 heads of garlic
1 quart of beef broth or chicken broth
5 medium potatoes chopped
1 onion, chopped
1 teaspoon salt
1 teaspoon butter
2 teaspoons olive oil

Cut the heads o the garlic and wrap in aluminum foil. Place ina toaster oven to roast until brown. If you have the time peel it all and put it in the aluminum foil. Then you can just dump it in the soup and there is no waste.

While the garlic is roasting saute onion in 1 teaspoon butter and two teaspoons olive oil until lightly golden. Add broth, salt and potatoes and cook covered until potatoes are tender. You may have to add water to thin depending on the size of your potatoes. Add garlic when roasted.

Blend soup with an immersion blender or a regular blender. Return to the pot and heat gently until ready to serve. It's great with some crusty bread.

Wednesday, April 22, 2009

Cranberry Vanilla Coffee Cake


What could be more perfect than this recipe. I had about 2 cups of cranberries in the freezer and some vanilla sugar in my pantry that I have been adding pods to forever. I orginially saw the post on 3 B's Baseball, Baking and Books and have since seen it on quite a few blogs. So, I guess I was not the only one who was wowed by this recipe. I liked the taste of it so it will be a repeater. If you already have vanilla sugar on hand it is a quick throw together for company. Next time I make it, I will try another fruit, like blueberries.

Cranberry Vanilla Coffeecake
adapted from this recipe from Epicurious

1/2 vanilla bean, split lengthwise
1 3/4 cups sugar
2 cups fresh or thawed frozen cranberries (6 oz)
2 cups plus 1 tablespoon all-purpose flour, divided
2 teaspoons baking powder 3/4 teaspoon salt
1 stick (4 ounces) plus 1 tablespoon unsalted butter, softened, divided
2 large eggs
1/2 cup whole milk


Preheat oven to 375°F with rack in middle. Generously butter a 9- by 2-inch round cake pan. Line bottom with a round of parchment paper and butter parchment.

Scrape seeds from vanilla bean into a food processor with tip of a paring knife. Add sugar and pulse to combine. Transfer to a bowl and set aside. Pulse cranberries with 1/2 cup vanilla sugar in processor until finely chopped.

In a bowl combine 2 cups flour, baking powder, and salt. Set aside.

In a mixer beat together 1 stick butter and 1 cup vanilla sugar on medium-high speed until pale and fluffy. Add eggs 1 at a time, beating well after each addition. Scrape down side and bottom of bowl. Reduce speed to low and mix in flour mixture and milk alternately in batches, beginning and ending with flour, until just combined. Spread half of batter in pan, then spoon cranberry mixture over it, leaving a 1/2-inch border around edge. Top with remaining batter and smooth top. Blend remaining 1/4 cup vanilla sugar with remaining Tbsp each of butter and flour using your fingertips. Crumble over top of cake. Bake until a wooden pick inserted into cake (not into cranberry filling) comes out clean and side begins to pull away from pan, 45 to 50 minutes. Cool in pan 30 minutes, then remove from pan onto cooling rack and cool completely. Flip onto serving platter and dust with confectioners if desired.

Tuesday, April 21, 2009

RED DYE MYSTERIES


I'm doing an article for Daring Bakers about food dye. I am pretty excited about it. I learned something all from a comment on my Psychedelic Beet Bread from Grace over at A Southern Grace. Her comment, " I just learned what red food coloring is made from, so i'll be using something else in the future. :)", sent me out for some serious research regarding red food dye in particular. I will post the link when my article goes up so you can read it.

In preparation for my article I made these cool eggs. I wanted to test out the onion skin dyed egg thing. I know it's a bit late from Easter but I wanted to share.

I placed about 8 big, regular, onion skins in a 2 qt sauce pan. I filled the pan up 3/4 of the way to the top. I poured in about a 1/4 cup of white distilled vinegar and brought it to a boil. I cooled the mixture off and strained it. I placed my eggs inside and boiled it until my eggs were done and voila, reddish colored eggs. If you leave the skin in you will get some cool markings on your eggs.

Monday, April 20, 2009

From Pancakes to Waffles

Some years ago my friend made these amazing pancakes for me while visiting her in Virginia. I think this was one of my many nudges into the foodie world. My Mom had always made boxed pancakes and I was just so amazed that making a pancake batter was so amazingly simple. The recipe came from Bon Apetit. After that I was an avid Bon Apetit reader.

Over the years I have tweaked it a little. Basically this is the PANCAKE recipe:

1 1/3 cups flour
1 1/4 cups milk or buttermilk (if you add buttermilk you need to add a bit more)
1/4 teaspoon salt
2 tablespoons sugar
2 teaspoons baking powder
1/2 teaspoon vanilla
1 egg

Stir dry, together with a whisk. Add the milk, vanilla and egg, whisking to combine. Your batters consistency is key to the success of your pancakes. It needs to be thin enough to bake evenly. Just a tad thicker than buttermilk.


Since this discovery we have pancakes a lot or rather I should say we feed our kids pancakes a lot. This Sunday, I felt we all needed a change. I decided to put my waffle iron to good use. I consulted Bittman's book, How to Cook Everything, for a waffle recipe. Whew, were we ever impressed. It was a nice change from the usual and the kids really enjoyed it as well.

AMAZINGLY TASTY and QUICK WAFFLES
Adapted from How to Cook Everything by Mark Bittman

2 cups all purpose flour
1/4 teaspoon salt
2 tablespoons sugar
1 1/2 teaspoons baking soda
1 1/4 cups buttermilk
2 eggs, yolks and whites separated
4 tablespoons butter melted
1/2 teaspoon vanilla extract

In a large bowl, whisk together the flour, salt, sugar, and baking powder.
In another bowl, whisk the milk and the egg yolks together. Add the melted butter and vanilla. Stir the milk mixture into the dry ingredients until just combined; do not over mix.

Whip the two egg whites until stiff peaks form. Fold the whites into the batter. Cook the waffles according to your waffle iron’s directions.

Saturday, April 18, 2009

COOKIE and a CRAFT #7


Since I am throwing a cookie at you then I thought I should throw a craft at you as well. What the heck! This craft (don't look too closely at the garden there) was made last year. Pretty huh? Okay and dirty... sigh. It was a Martha Stewart idea. All you do is take a little mastic between the pots to hold them together and then the top. I found that a dowel running up the center helped to stabilize things a bit.

The kids had some Whoppers in their Easter baskets this year, from us and then also from their Grandparents. They were not really a big hit. I decided to use them for this recipe from Dorie Greenspan. The cookies had great flavor. The kids loved them even though they weren't thrilled with the Whoppers, go figure.

Chocolate Malted Whopper Drops
Dorie Greenspan, Baking from my Home to Yours

1 3/4 cups all purpose flour
1 cup malted milk powder
1/4 cup unsweetened cocoa powder
1 1/2 teaspoon baking powder
1/4 teaspoon salt
1 stick plus 3 tablespoons unsalted butter at room temp.
2/3 cups sugar
2 large eggs
1 teaspoon pure vanilla extract
1/4 cup whole milk
2 cups (6 ounces) chocolate-covered malted milk balls, coarsely chopped
6 ounces bittersweet chocolate, coarsely chopped or 1 cup store-bought choc chips or chunks

GETTING READY: Position the racks to divide the oven into thirds and line two baking sheets with parchment or silicone mats.
Sift together the flour, malted milk powder, cocoa, baking powder, and salt.
Working with a stand mixer, preferably fitted with a paddle attachment, or with a hand mixer in a large bowl, beat the butter and sugar together on medium speed for about 3 minutes, until very smooth. Add the eggs one at a time, beating for about a minute after each addition. Beat in the vanilla; don't be concerned in the mixture looks curdled - it will even out when the dry ingredients are added. Reduce the mixer speed to low and add half the dry ingredients, mixing just until they disappear in the the batter. Mix in the milk, then the remaining dry ingredients, mixing only until they are incorporated. The batter will look more like fudge frosting than cookie dough - and that's fine. With the mixer on low, or by hand with a rubber spatula, mix in the malted milk balls and chopped chocolate.
Drop the dough by rounded tablespoonfuls on to the sheets, leaving about 2 inches of space between spoonfuls. Bake for 11 to 13 minutes, rotating the sheets from top to bottom and front to back after 6 minutes. When done, the cookies will be puffed and set slightly but soft to the touch. Let the cookies rest for 2 minutes before using a wide metal spatula to transfer them to the racks to cool to room temperature.
Repeat with the remaining dough, cooling the baking sheets between batches.

Friday, April 17, 2009

BROCCOLI and CAULIFLOWER SOUP

For many soup season draws to a close at the end of winter. For me it just keeps right on going. Warm and cold soups it doesnt matter. My Mother, who grew up on a farm, told me about eating soup in the summer. Her mother told her that the soup helped the farm hands to sweat and thereby cool off. My Mother remembers them all sitting together under the shade tree eating soup.

That shade tree has many an interesting story. My Grandfather, Jaju (don't know how to spell that in Polish), was quite the joker. I guess he and his brother Walter use to do some pretty funny stuff (maybe it was all that moonshine, who knows). On Sundays, after chores were done, they'd gather for a picnic under the shade tree. My Grandfather use to put a ladies wig on for kicks. Of course living by a busy road this was not a good idea. People driving by couldn't help but stare. Ah, yeah, back in the 1930's and 40's I'd say that would be a sight to behold.

Then of course there is the story of them fishing at the fish hatchery and being chased by the police afterwards. Yes. That was my Grandfather.

The bread below, pumpernickel, is yet another glorious bread from Artisan Bread in Five Minutes a Day. I had borrowed the book from the library but I see now that I need to have it! I have been making bread from there regularly. While I will still make bread from other books, this one here will be my everyday-kind-of-bread-kind-of-book!
Broccoli and Cauliflower Soup

3 cups broccoli, chopped
3 cups cauliflower, chopped
4 cups turkey broth
1/2 or whole onion
1 sm. potato, diced
4 oz. cheddar
1/2 c. milk
1 garlic clove, minced
pepper to taste
1/2 teaspoon seasoned salt

Saute onions in a tablespoon of butter until golden. Add broth, garlic, broccoli, cauliflower, and potato to a boil in a 4 quart saucepan. Reduce heat, cook covered, 15 minutes. Remove about 1 cup broccoli and cauliflower pieces, set aside. Cook soup 10 minutes longer. Add shredded cheese and heat until melted Pour into blender and puree until very smooth. Return pureed soup to pan with reserved vegetables and heat through, but do not boil or cheese will curdle. Add milk, salt and pepper.

Wednesday, April 15, 2009

Shrimp and Ham Jambalaya


When I first moved to Arizona I decided to put myself out there to try and meet people. I checked the paper to see what was doing around town and I saw that there was a Crawfish Festival. Since I use to pick them out of a stream near my house when I was a kid, I decided it was time I should go and eat some. What the heck. Of course I didn't meet a single soul but at least I put myself out there. What this all has to do with Jambalaya, I don't know but my interest in Cajun food began there.

Shrimp and Ham Jamblaya
Based on this recipe from About.com

1 1/2 cups diced cooked ham
2 tablespoons vegetable oil
1 medium onion, quartered and sliced
1 cup okra, sliced
1/2 cup chopped red pepper
1 clove garlic, minced
1 can (14.5 ounces) diced tomatoes
1 can (6 ounces) tomato paste
2 1/2 cups water
3/4 cup uncooked long-grain rice
1 large bay leaf or two small
1/2 teaspoon salt
1/4 teaspoon dried leaf thyme
1/8 teaspoon ground cayenne pepper, or to taste
1 pound peeled, cleaned, and cooked shrimp

Heat oil over medium heat in a large pan. Saute onions, bell pepper, and garlic; cook until tender. Add ham and cook for about five minutes. Add tomatoes and tomato paste, water, bay leaf, salt, thyme, and cayenne pepper. Stir until thoroughly mixed and then add rice. Bring to a boil then reduce heat and simmer for 25 minutes, stirring occasionally. Add shrimp and heat through. Serve with crusty garlic bread or cornbread. Serves 4 to 6.

Monday, April 13, 2009

Chicken and Bean Chili


Well, I am back from my glutton filled weekend away. We went to see my relatives in PA. Way too much eating. Oh I embarassed to tell you that I ate way (weigh) too much but a good thing came out of it- I am remotivated. My cousin just started WW and she was so good, watching everything she ate. While I felt sick because I ate too much. Such a stark contrast. Oh the guilt. But, I hereby let the guilt go and I will pick up my calorie notebook and have at it again. Hello Sparkpeople. Goodbye gluttony. I am joining the ranks of the goodeaters in our battle of the bulge!

I am all for fully loaded posole, as you can see in that link. So I transferred the concept to my chicken and bean chili. Iwished I had some avocadoes to add to it.

Chicken and Bean Chili

1 can white beans, half of them mashed
2 cloves of garlic, minced or pressed
8 oz cooked chicken diced
1 teaspoon chili powder
2 teaspoons cumin
1 teaspoon oregano
1 cup onions, chopped
2 cups chicken broth or veggie broth
1/4 cup chopped cherry pepper chilies (you could use regular chiles- I just have a ton of them frozen)
1 tablespoon olive oil
2 oz Empire cheese shredded
s and p to taste
Garnish with: radishes, cilantro, avocado, green onions

Saute onions until golden, add garlic cook one minute more. Add broth, spices, chilies and beans. Bring to a boil and simmer for about 20 minutes. Add cooked chicken, cook five minutes more, just until the chicken is heated through. Garnish with some shredded cheese and any veggies you would like.

Sunday, April 12, 2009

Happiness to YOU!


Today I was at the Dentists office and the receptionist and I were complaining about the weather. I told her that I use cold days in Spring to do my Spring cleaning. That way when a warm weather day comes around I can get outside. She said, thats a good way to look at it. When she said that it got me thinking how lucky I am really, with wars going on in so many countires, terrorism, sickness, ships being held up by pirates, kids missing, let me count my blessings. Truly I have many. Today I will look for the beautiful things in my life and shout out a thank you to whoever is listening.

Whether you celebrate Easter, Passover or Life, I want to wish you happiness today and always. Enjoy every moment that you can, giving gratitude the whole time.

Friday, April 10, 2009

Crunchy Granola


I have a friend that calls "hippie" type people, "crunchy". I asked her one day why she would call people crunchy. She said because they are the type of people that eat granola and wear Berkenstocks. Ha! God love my friend. I guess I am kind of crunchy too. I use to wear Berkenstocks until they started killing my feet (won't bore you with that story). And for sure I eat granola. I love granola. Really, I can hang with Hippies, I can hang with just about any kind of person (as long as their decent people of course). I am like my Father in the way that he does not know any strangers. However, with the addition of kids I have become more guarded but all in all, I just love people. I watch all the reality shows like Biggest Loser and Survivor just to watch people interact. I find it fascinating. When I worked as a Social Worker in a Nursing Home I remember watching some of the caregivers, in complete awe of their wonderful way with patients. The way they could go about daily care giving routines with such respect, love and humor. They did an outstanding job. I would often find myself staring at them. They probably thought I was crazy. Really, I was just filled with admiration. So the next time you feel uncomfortable because someone is staring at you- maybe they are like me, and just really admire who you are.

To think that paragraph started out about granola and hippie type people. Whoa.

I have always wanted to make granola- I've made granola bars. When I saw Zoe and Jeff's recipe for granola, I liked the sounds of it. It has less fat than most granola recipes. It is delicious. The kids are really enjoying it. Maybe we will have enough to make their bread next week.

HOMEMADE GRANOLA for GRANOLA BREAD
recipe courtesy of Zoe Francois
Artisan Bread in Five Minutes A Day, St. Martin's Press, NY


1/3 cup honey
1/4 cup maple syrup
1/3 cup canola oil
2 tablespoons water
1/2 teaspoon vanilla extract
1/4 teaspoon ground cinnamon
1/4 teaspoon salt
4 cups rolled oats
1/4 cup sesame seeds
3/4 cup chopped pecans or the nut of your choice
3/4 cup shredded unsweetened coconut
1/2 cup raisins
1/2 cup dried cherries, chopped dried apricots or dried cranberries (or a combination)


Preheat oven to 350F. Prepare a high-sided cookie sheet or a lasagne pan with parchment paper. oil butter or a large silicone mat.

Mix honey, maple syrup, oil, water, vanilla extract, cinnamon and salt in a alrge measuring cup.

In a large bowl, combine the dry ingredients except for the dried fruit, and mix until everything is coated with the hony mixture. Spread the mixture evenly over the prepared baking sheet. Bake for about 30 minutes, stirring every ten minutes, until the mixture is golden brown. Baking time will vary depending on the depth of granola in the cookie sheet or pan.

After the baking is complete, add the dried fruit.

Allow to cool, store in jars and use in Aunt Melissa's Granola Bread.

Thursday, April 9, 2009

Rainbow Pasta, aka Pasta Primavera

First, I wanted to let you know that I wrote an article for Daring Bakers on growing your own herbs. You can check it out by clicking here. I was so excited to write for this group. Besides being a great group of people with lots of fun challenges, they now have new features to their site, including articles.

My inspiration for this lovely dish came from blog hunting. I saw some Pasta Primavera on HoneyB's site The Life and Loves of Grumpy's Honeybunch. It was one of those things where I knew I had to make it right away. So I threw together some fresh and frozen vegetables to create a Pasta Primavera. I usually have whole grain pasta but this time I figured with the dish being mostly vegetables it would be okay to have some white pasta. A girls gotta splurge once in a while, right?

Pasta Primavera

1 pound of asparagus
2 cloves of garlic chopped
1/2 pound pasta ( I used 2 cups cooked to add to the dish)
3/4 cup peas
1 carrot, matchstick sliced
1 red pepper, sliced
2 tablespoons olive oil, divided
s and p to taste
freshly grated peccorino romano or something similar

Cook pasta and set aside. While pasta is cooking chop up all your vegetables. In a large frying pan, cook asparagus in some water. Cover and cook to al dente. Remove asparagus and set aside. Drain water. Dry pan with a paper towel. Add 1 tablespoon olive oil and saute peppers and carrots until tender. Add garlic cook one minute more. Stir in peas and pasta and reserved asparagus. Add 1 more tablespoon of olive oil. Serve in large bowl with freshly grated cheese.

Tuesday, April 7, 2009

Sponge Candy

Many people have never heard of sponge candy. Some people know it by a different name: hokey pokey, puff candy, cinder toffee, sponge toffee, seafoam, honeycomb, or honeycomb toffee (according to this site). The confection is made with the following ingredients: corn syrup or molasses, brown sugar, baking soda, and vinegar.

The above candy is made by Platter's. You can find them here. I highly recommend them. I find their sponge candy and chocolate to be one of the best I have ever had. It's very creamy. When it is fresh it is a different texture than when it is stale. I love it both ways. Some people like their sponge candy to get stale. They like to crunch. This may be the same people who like their Peeps stale. (ahem, Rossie).

If you want to make it at home, here is a recipe.

To make sponge candy at home, heat one cup of brown sugar, one cup of corn syrup, and one tablespoon of white vinegar in a heavy saucepan over medium heat until the mixture reaches the brittle stage, around 300 degrees Fahrenheit (149 degrees Celsius). Remove the mixture from the heat, stir in a tablespoon of baking soda, and then pour it into a very well oiled pan to set. After the sponge candy has hardened, tip it out and crack it apart or cut it. Keep the candy wrapped in wax paper in an airtight container.

Monday, April 6, 2009

Quick Quiche


When my husband and I went to Ithaca, NY for our anniversary this past October we stayed at a B and B called The Yellow Barn. It was our first experience at a B and B. We loved our time there. Our lovely hostess was a woman from France. For our breakfast the second morning we had quiche. It was so tastey and creamy. While I do not have her recipe I am venturing to guess that she used heavy cream. It was so delicious. My husband absolutely loved it and kept talking about it. I knew I needed to make quiche again and wow, it only took me, what, six months to finally make it.

I toned the calories down quite a bit, adding light cream instead of heavy cream. Still very tastey. I have made it two times. One pictured above with broccoli and one with asparagus. We loved them.

QUICK QUICHE
20 minute prep.

1 teaspoon herbs de Provence
3 eggs
3 egg yolks
1 cup light cream
2 oz shredded cheddar
5 oz deli ham
1 1/2 cup broccoli, lightly cooked and chopped
1 round of pre packaged pie dough

In a deep dish pie pan or a nine inch round, press in and smooth out the pie crust. Refrigerate while preparing the remainder of the ingredients.

With a whisk in a large bowl, whip the eggs and cream together until completely combined. Add in cheddar, ham and broccoli, berbs de Provence, and s & p to taste. Pour mixture into prepared pan and bake in a preheated oven at 350F.

297 calories for 1/8 of the quiche.

Saturday, April 4, 2009

Dill-icious! Low Fat Dill Dip and Salmon Burgers

When I was growing up my Mom would make salmon burgers, bleck, tu - tu (spitting). I hated them. Frankly, I thought it was rather cruel of her to serve such a thing. Oh, the mind of a child. Now that I am an adult, I see the error of my ways. First, I should have been grateful to get food! (Can you tell I am a Mom?). Second, what the fruit was I thinking? Salmon burgers, done right, are absolutely amazing. Really!

When I lived in South Carolina, something made me try salmon burgers again. I guess it was the recipe I saw on Epicurious for dilled salmon burgers. I was so curious. Maybe these would be different. Indeed, they were. Great flavor. Canned salmon is not so bad if you don't have fresh. I have used both.

I know I have mentioned SC before but did you know I lived in a little town called Abbeville. A great little town. With really great restaurants. I have to say some of the best food I have had at a restuarant was there. Who'd have thunk it? They told me there that their big claim to fame was that Julia Roberts had come to their town to film a part in Sleeping with the Enemy. Don't tell her but they thought she was a SNOT! Who knows maybe she had a cold or something. And, well, the people of SC couldn't be any more friendlier if they tried, so I guess anyone would look like a snot next to them! Maybe she is, maybe she's not but I loved to hear them talk about it.

Dill and Caper Spread

1/2 cup dill
4 oz soft tofu
2 generous tablespoons mayonnaise
1 clove garlic, minced
2 tablespoons low fat mayo
juice of a half of a lemon
2 tablespoons capers
1 teaspoon kosher salt
fresh crushed peppercorns to taste

Whiz these amazingly flavored ingredients (okay, tofu is not exactly packed with flavor now is it?) in a processor or blender until smooth. Add salt to taste. If you don't mind some extra calories, throw in a tablespoon of olive oil, it will make it creamier. I have to say it was pretty good as is.


Dilled Salmon Burgers

1/4 cup chopped fresh dill
2 generous tablespoons mayonnaise
12 crushed saltine crackers or soda crackers
1 egg
12- 16 oz. fresh salmon, chopped into a medium dice

Combine all together. Form into patties and refrigerate for at least an hour. Fry on a med/high skillet until golden. I used two teaspoons of butter to fry them.

Thursday, April 2, 2009

Cottage Cheese and Dill Bread


Loved this bread. Packed with flavor and great texture. I am sure you heard about Zoe and Jeff's book, Artisan Bread in Five Minutes a Day. Well, I was curious about it so I made a batch. Baked a plain loaf the first night, a pizza the second night and on the third night mixed in some stuff to make Cottage Cheese Dill Bread. The plain loaves were absolutely outstanding with great flavor. So, of course, the addition of dill and cottage cheese made it even better.

I can't tell you enough how much a piece of cake this bread is. It does not sacrifice flavor either. Once you have your master made which is almost as easy as making a box cake, you are good to go. Dough poised and ready for your every bread whim.

Artisan Bread in Five Minutes A Day
Basic Bread Recipe, click here for the NY Times article.

Adapted from “Artisan Bread in Five Minutes a Day,” by Jeff Hertzberg and Zoë François (Thomas Dunne Books, 2007)

Time: About 45 minutes plus about 3 hours’ resting and rising

1 1/2 tablespoons yeast

1 1/2 tablespoons kosher salt

6 1/2 cups unbleached, all-purpose flour, more for dusting dough

3 cups warm water (110F)

Cornmeal.

1. In a large bowl or plastic container, mix yeast and salt into 3 cups lukewarm water (about 100 degrees). Stir in flour, mixing until there are no dry patches. Dough will be quite loose. Cover, but not with an airtight lid. Let dough rise at room temperature 2 hours (or up to 5 hours).

2. Bake at this point or refrigerate, covered, for as long as two weeks. When ready to bake, sprinkle a little flour on dough and cut off a grapefruit-size piece with serrated knife. Turn dough in hands to lightly stretch surface, creating a rounded top and a lumpy bottom. Put dough on pizza peel sprinkled with cornmeal; let rest 40 minutes. Repeat with remaining dough or refrigerate it.

3. Place broiler pan on bottom of oven. Place baking stone on middle rack and turn oven to 450 degrees; heat stone at that temperature for 20 minutes.

4. Dust dough with flour, slash top with serrated or very sharp knife three times. Slide onto stone. Pour one cup hot water into broiler pan and shut oven quickly to trap steam. Bake until well browned, about 30 minutes. Cool completely.

Yield: 4 loaves.

*****So here's what I did. I took out whatever was remaining of my master dough and added about:

a cup and a half of ap flour
1/3 cup minced dill
1/4 cup dried minced onion
1 cup cottage cheese (no I did not warm it)

I kneaded this on the counter until it was fully incorporated, adding about a half cup of water total ( a little at a time).

I let it rise in a wooden bowl for about an hour. I rolled it and put in a 1 1/2 pound loaf pan, covered it and let it rise again for about 45 minutes. Finally, I baked it at 450F.

Wednesday, April 1, 2009

Recipes to Rival: Steak Diane Flambe


The Recipes to Rival Crew is at it again. The hosts for March were Temperance of High on the Hog and Shawnee of Delishes Delishes. The recipe of the month was Steak Diane Flambe.... ooh fire. Ah yeah, it didn't quite happen for me. So dissapointing, I was so looking forward to the flames. There is something so primal about torching your food. You were suppose to tip the pan to ignite the alcohol in the brandy. Sadly, it just didnt happen. If I were to do it again or a dish similar I think I would use a long tipped lighter instead. Click here for a complete post with more pics.

Steak Diane Flambe

Ingredients

For the steaks
4x85g beef medallions
1 tsp Dijon mustard
freshly ground salt and pepper

For the sauce
1 tsp Butter, clarified
1 tsp Worcestershire sauce
2 tbsp Shallots, finely chopped
50g button mushrooms, finely sliced
1 tbsp lemon juice
125ml double cream
1 tbsp Chives, snipped
50ml Brandy

Method 1. Rub the medallions of beef with the mustard, season with salt and pepper and set aside.
2. Heat a large frying pan over a medium heat and when hot, add the clarified butter and Worcestershire sauce.
3. Add the shallots and mushrooms, and push to the centre of the pan. Arrange the medallions around the edge. Cook for 2 minutes, stirring and tossing the mushroom mixture as you go. If you prefer your steak well done, give it an extra minute or 2.
4. Add the lemon juice and season with salt and pepper.
5. Turn the steaks over and pour in the cream and chives. Tilt the pan slightly (away from you) and pour in the brandy at the far end. Now turn up the heat to high so that the brandy ignites. Swirl the sauce around in the pan and turn off the heat.
6. Put the medallions on 4 plates, pour over the sauce and serve.