Showing posts with label nuts. Show all posts

Tuesday, January 10, 2017

Banana Bread


I make banana bread without nuts here at my house because my kids don't like the nuts in their dessert.  This time, I decided to add the nuts into each individual loaf, leaving a few without nuts. Wow, the taste is so much better with the nuts.  I forgot how much I missed that.

Day 3 of my Healthy 2017 and I am doing sit ups.  Did 25!  Yeah, go me!  I also did a cardio workout on You Tube from Pop Sugar.

BANANA BREAD
This recipe is from Epicurious and seriously the most banana per flour ratio I have ever seen.  I like that because if I am making banana bread it is because I have quite a few bananas to use up. But I will be honest here, I put in a few more ounces then they did.  I probably hit 16 ounces, possibly more.

1/2 cup (1 stick) unsalted butter, at room temperature
1 2/3 cups all-purpose flour
4 medium very ripe bananas (about 13 ounces), peeled and mashed
1/4 cup sour cream
1 teaspoon vanilla extract
1 teaspoon baking powder
1/2 teaspoon baking soda
1/2 teaspoon kosher salt
1 cup (packed) dark brown sugar
2 large eggs, at room temperature
1/2 cup chopped walnuts

Cream the butter with the sugar for a few minutes.  Add in vanilla.  Add eggs one at a time. Add sour cream and bananas.  In a separate bowl, combine flour, baking soda, baking powder and salt. Add the dry ingredients to the wet.  Fold in walnuts at the end.  Or place them in the little loafs or muffin tins, whatever you like.

Pour into sprayed tins or a loaf pan.  Bake in a preheated 350F oven for 45 to 60 minutes depending on what you are baking in.  If you are using a loaf pan it will be all of an hour before it is done, especially if you add more banana.

Saturday, November 21, 2015

BROWNED BUTTER PUMPKIN CAKE


This cake is like, seriously, the BEST cake I have ever had.  Do not let this cake ever pass you by.  You must make it.  If you like cake, this is your cake.

I have been wanting to make this cake for like, two years.  My Mom's birthday was coming up and I thought I am not giving her a choice in cakes this year, I AM MAKING THIS CAKE.  Oh, I am so glad I listened to myself.  She loved it too.  She says to me after eating it.  This cake is a keeper.  Its in your top ten!

I wish I had taken more glamor shots of individual slices.  But alas, I sent my folks home with some and it was gone before I even had a chance.  The disappearing cake.  That kind of says it all.


BROWNED BUTTER PUMPKIN CAKE
slightly adapted from a recipe by from Fine Cooking
Issue 107

6 oz. (3/4 cup) unsalted butter; more for the pans
9 oz. (2 cups) unbleached all-purpose flour; more for the pans
1-1/2 tsp. baking soda
1-1/2 tsp. ground cinnamon
1 tsp. ground ginger
3/4 tsp. table salt
1/4 tsp. ground cloves
1-1/2 cups granulated sugar
2/3 cup firmly packed light brown sugar
2 large eggs
1/3 cup buttermilk
2 teaspoons vanilla
1 1/2 cups [umpkin puree

For the topping
1-1/2 Tbs. unsalted butter
2/3 cup pecans
1/2 cup unsalted, raw, hulled pepitas
2 Tbs. firmly packed light brown sugar
1/4 tsp. table salt
1-1/2 Tbs. chopped crystallized ginger

For the frosting
8 oz. (1 cup) unsalted butter
8 oz. cream cheese, at room temperature
1/3 cup firmly packed light brown sugar
5 oz. (1-1/4 cups) confectioners’ sugar

 
Make the pumpkin purée
Position a rack in the center of the oven and heat the oven to 350°F. Brush a 9x13-inch baking dish with the oil. Put the pumpkin halves in the dish cut side down and bake until tender when pierced with a fork, about 45 minutes. Let cool. Peel the pumpkin and purée the flesh in a food processor until smooth. You’ll need 1-1/2 cups of the purée for the cake. Refrigerate or freeze any remaining purée for another use.

Make the cake
Position a rack in the center of the oven and heat the oven to 350°F.

Butter and flour two 9-inch round cake pans with removable bottoms (or butter two 9-inch round cake pans, line the bottoms with parchment, butter the parchment, and flour the pans).

Melt the butter in a heavy-duty 1-quart saucepan over medium heat. Cook, swirling the pan occasionally until the butter turns a nutty golden-brown, about 4 minutes. Pour into a small bowl and let stand until cool but not set, about 15 minutes. (*Be careful because there will be white foamy stuff on top from the milk particles in the butter. You wont be able to see the bottom browning easily.  Pay close attention because it will go from brown particles on the bottom to black particles real quick. Then it will just be bitter).

In a medium bowl, whisk the flour, baking soda, cinnamon, ginger, salt, and cloves. In a large bowl, whisk 1-1/2 cups of the pumpkin purée with the granulated sugar, brown sugar, eggs, vanilla and buttermilk until very well blended. With a rubber spatula, stir in the flour mixture until just combined. Gently whisk in the brown butter until completely incorporated. Divide the batter evenly between the prepared pans.

Bake the cakes until a tester inserted in the center comes out clean, about 28 minutes. Let the cakes cool in the pans for 10 minutes. Turn the cakes out onto racks, remove the pan bottoms or parchment, and cool completely.
 

Make the topping
Melt the butter in a heavy-duty 12-inch nonstick skillet over medium heat. Add the pecans and pepitas and cook until the pecans brown slightly and the pepitas begin to pop, about 2 minutes. Sprinkle in the brown sugar and salt and stir until the sugar melts and the nuts are glazed, about 2 minutes. Stir in the ginger. Remove from the heat and let the mixture cool in the skillet.
Make the frosting
Melt the butter in a heavy-duty 1-quart saucepan over medium heat. Cook, swirling the pan occasionally until the butter turns a nutty golden-brown, about 4 minutes. Pour into a small bowl and let stand until the solids settle at the bottom of the bowl, about 5 minutes. Carefully transfer the bowl to the freezer and chill until just firm, about 18 minutes. Using a spoon, carefully scrape the butter from bowl, leaving the browned solids at the bottom; discard the solids.

Using an electric mixer, beat the butter, cream cheese, and brown sugar on medium-high speed until light in color and the brown sugar has dissolved, 2 minutes. Gradually beat in the confectioners’ sugar and continue beating until fluffy, 1 to 2 minutes.

Assemble the cake
Put one cake layer on a cake plate. Spread 1/2 cup of the frosting on the layer. Sprinkle 1/2 cup of the nut mixture over the frosting and top with the second layer. Frost the top and sides of the cake with the remaining frosting. Arrange the remaining topping in a ring 1-1/2 inches in from the edge of the cake and serve

Make Ahead Tips
You can make the purée up to 2 days ahead. The assembled, frosted cake can be covered with a cake dome and refrigerated for up to 2 days. Serve at room temperature.

nutrition information (per serving):
Calories (kcal): 660; Fat (g): fat g 36; Fat Calories (kcal): 320; Saturated Fat (g): sat fat g 18; Protein (g): protein g 7; Monounsaturated Fat (g): 11; Carbohydrates (g): carbs g 80; Polyunsaturated Fat (g): 4; Sodium (mg): sodium mg 440; Cholesterol (mg): cholesterol mg 115; Fiber (g): fiber g 2;

Thursday, January 29, 2015

ASIAN STYLE SALAD with Creamy Orange Ginger Dressing


Today, it was chemistry in the kitchen.  What was I searching for?  A perfect recipe for the famous Asian type salad (that I love- I mean really love) at a certain restaurant chain that I once frequented.  That is until I found out how many stinkin' calories were in this salad.  Ah, yes, enough to have a couple cheeseburgers instead.  Thats just WRONG people!  Salad is suppose to be healthy!

Make it yourself.  Enter Tyson Crispy Chicken.  No fuss.  No mess.   Of course you can make your own chicken but I hate frying chicken.  And, yes, you can used grilled chicken, but I was really trying to recreate what I missed from that restaurant.  So follow this exactly and you will have that famous salad of theirs in your own kitchen.  And dare I say, you might even like it better.

ASIAN STYLE SALAD with Creamy Orange Ginger Dressing

The dressing.

3/4 cup orange juice*
1/4 cup seasoned rice vinegar
1/2 teaspoon powdered ginger
1/2 teaspoon granulated garlic
2 tablespoons cornstarch or tapioca starch
1 teaspoon sesame oil
1/2 cup vegetable oil, sunflower oil or canola oil

In a small sauce pan mix orange juice, rice vinegar, ginger, garlic and corn starch.  Heat until it thickens.  Remove from heat, stir in sesame oil.  Let cool.  Once it has cooled completely whisk in vegetable oil.

If it is too thick for your tastes, whisk in orange juice to get the desired consistency.

The salad.

1-2 cups romaine lettuce, chopped
1 tablespoons toasted almonds
1/2 tablespoon sesame seeds
1/4 cup mandarin oranges
1 or 2 strips Tyson Crispy Chicken
2 tablespoons spelt or oat bran sesame sticks
2 radishes, sliced (this is not in the original restaurant salad but gives crunch)

Arrange a bed of lettuce in a bowl.  Layer in the oranges, nuts and seeds, radishes, sesame sticks and chicken.  Pour dressing over top. Serve.


* If you have a large can of oranges, you can drain them and use the juice from that.  It will be about 3/4 of a cup.

Calories: Using one Tyson Crispy Chicken strip, two tablespoons of the dressing and of course following all the measurements, this salad ends up being around 450 calories.  WAY better than the restaurant salad.  Mainly because of making your own dressing.

Full Disclosure:  I received a coupon to buy Tyson Chicken.  I was not paid in any other way.  I was not told what to say. 

Saturday, December 21, 2013

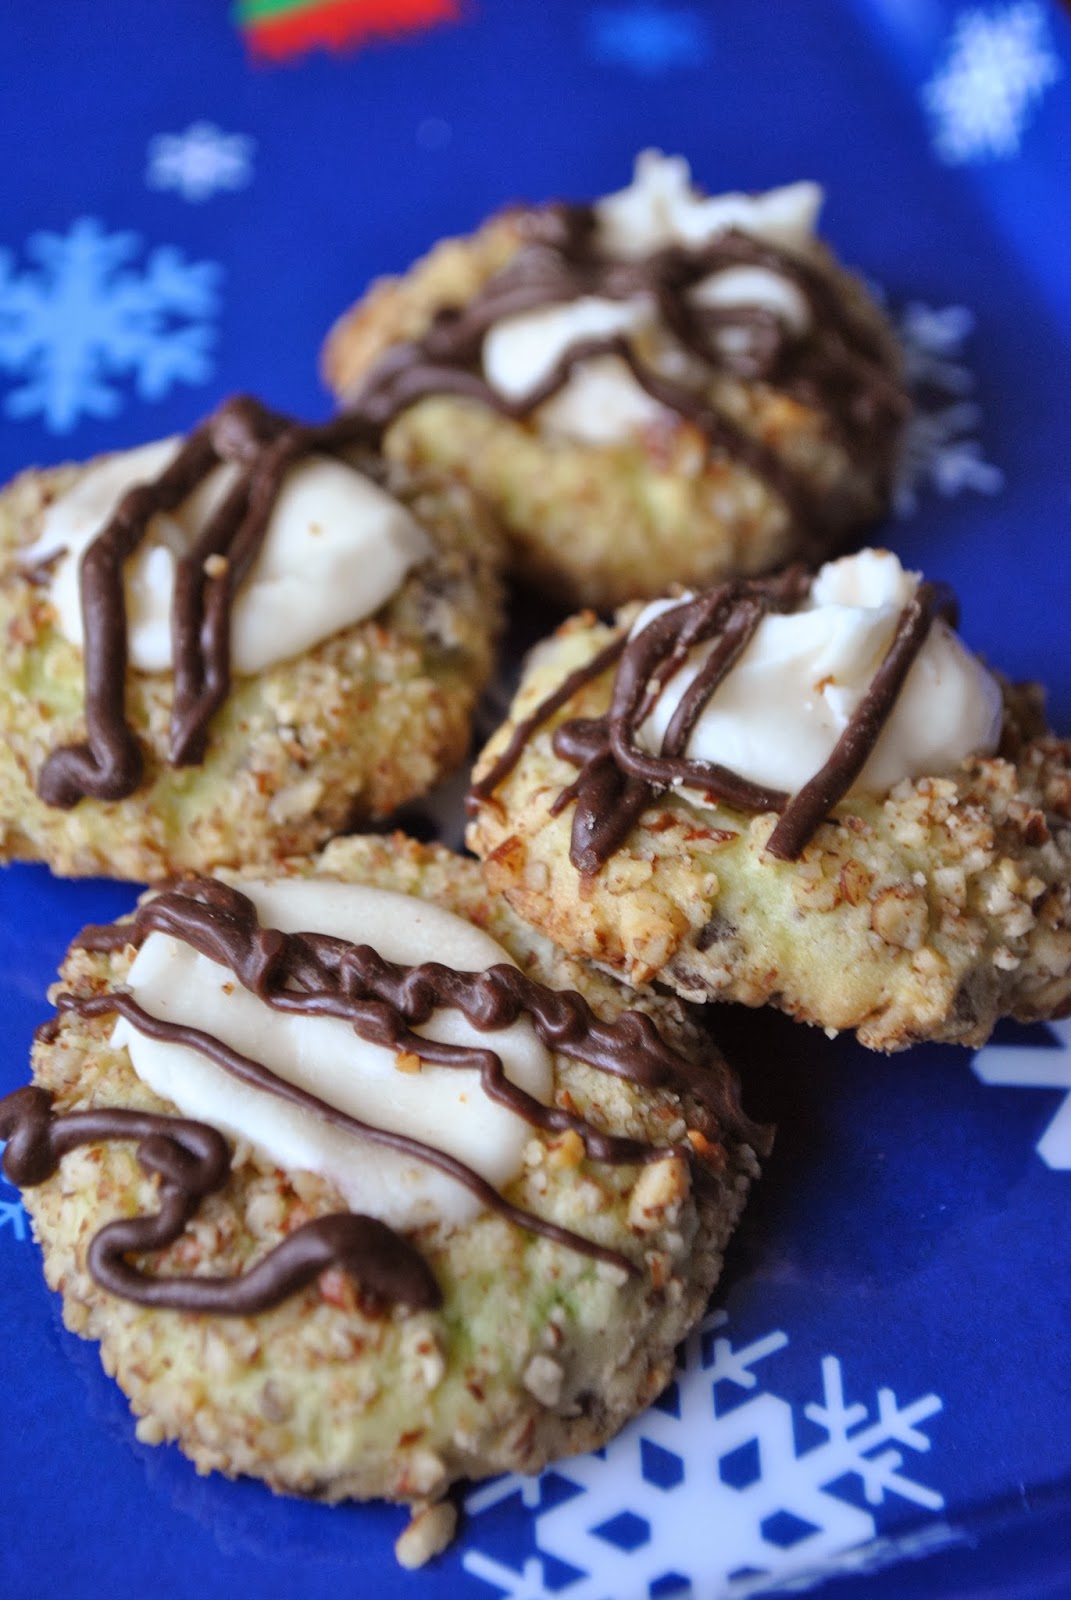
Chocolate Pistachio Thumbprints


Today I really wanted to make cookies.  But I wanted to make scones just a little bit more.  Packaged up a few scones with a jar of peach amaretto jam, and sent it off with my daughter's friends parents.  Hope they like scones.  I will be passing the recipe onto you soon.  A great scone.  I did a little experimentation and came up with a scone recipe of my own.  One more time to test and I will pass that one along to you as well.

Then I sat myself down at my sewing machine and worked on some last minute gifts.  It has been very relaxing even though it is last minute. So the cookies never became a reality.  One less cookie around here is probably a good thing.


These cookies from the cookie exchange are real beauties aren't they?  A nice addition to your cookie tray.  They are decorative and delicious. 

Chocolate Pistachio Thumbprints
Printable can be found here.

1/3 cup powdered sugar
1 cup butter, softened
1 teaspoon vanilla
3/4 teaspoon almond extract
3 1/2 oz. package of pistachio pudding and pie filling mix
1 egg
2 cups flour
1/2 cup miniature chocolate chips
3/4 cup to 1 1/4 cups finely chopped pistachios

filling:
1 1/2 cups powdered sugar
2 tablespoons butter, room temp
1 teaspoon vanilla
1 to 3 tablespoons milk

glaze:
1/2 cup semi-sweet chocolate chips
2 teaspoons shortening

Preheat oven to 350F. Lightly grease a couple cookie sheets.  I like to use a lot of cookie sheets and then have them already to go.  I never put cookies on a warmed pan.  They will spread quite  a bit if you do that.

In a large bowl cream butter and sugar together.  Add in extract, pudding mix and egg.  Add flour and 1/2 cups chocolate chips, until well blended. Shape into 1 inch balls, roll in nuts.  Place two inches apart on a baking sheet.  With thumb make an indentation in center of cookie.  Bake for 10 to 14 minutes, until edges are lightly brown. Cool one minute before removing from cookie sheet.  Cool.

In small bowl combine the filling ingredients and stir until smooth.  Spoon a scant teaspoon into indentation.  Melt 1/2 cup of chocolate chips and shortening in the microwave.  Drizzle onto cookies.  Makes 3 to 4 dozen.

Tuesday, December 17, 2013

Thumb Print Cookies


Wrapping, shopping, decorating, elf shananigans, parties, get togethers, Holiday specials... whoa there is a lot to do.  Everyone is busy.  Remember to treat yourself this Holiday season to a little relaxation somewhere a long the line.  If you absolutely can't because you have to much to do. Remember to breathe.  Take a deep breath periodically and remind yourself the world wont fall apart if you forgot to do something.  Deep breath...

Hope you have found some time for a little bit of tea and maybe one of these cookies with it.  These are very good.

Thumb Print Cookies
 
1 cup butter
1/2 cup brown sugar
2 egg yolks
1 teaspoon vanilla
2 cups flour
1/2 teaspoon salt
1 1/2 cups chopped nuts
jar of the jelly you like- strawberry or raspberry are good choices.

Mix butter, sugar, egg yolks and vanilla together thoroughly.  Stir in flour and salt.  Mold dough into balls with hands and roll in finely shopped nuts.  Place on ungreased baking sheet.  Bake at 375F for five minutes.  Remove from oven and make a thumb print in top of each cookie.  Return to oven and bake for five to nine minutes more.  When cool, fill thumb prints with jelly.


Wednesday, October 30, 2013

Butternut Squash Muffins


These are absolutely tender and delicious. I wanted to turn around and make another batch right away since we were getting company and guess what?  I did. Half of  them I sprinkled with pepita seeds (pumpkin seeds) and the other half I left plain, thinking my girls would not be too into the see thing.  I was going to frost them to make them more enticing.  But guess what?  They totally do not need it and why pile on more sugar when it tastes so good without it.

Butternut Squash Muffins

2 cups roasted butternut squash puree (or canned pumpkin if you prefer)
1 cup almond flour
1/2 cup pumpkin seeds
2 tsp baking soda
2 tsp baking powder
3 ½ cups all-purpose flour
1  cup light brown sugar
1  cup granulated sugar
4 eggs
½ tsp nutmeg
2 tsp cinnamon
1 ½ tsp salt
1 cup canola oil
¾ cup buttermilk


In a large bowl add the almond flour, the all purpose flour, baking powder, baking soda, sugars, cinnamon, nutmeg and salt in a bowl. Stir to combine.  Make a well.  Add the squash, oil, and buttermilk.  Stir.  Add eggs one at a time to incorporate.  Scoop out a little less than half cup portions into muffin tins. If you are putting pumpkin seeds on, this is the time to do it.  Sprinkle with about a tablespoon of seeds per muffin cup. Bake at 325F for about 20 to 30 minutes.  Test with a toothpick or a skewer. Will make a little over 24 muffins.  I pour the rest into a ramekin.  This is the bonus muffin.

160 calories per muffin.

*I used buttercup.  If you look in my previous post it is in one of the pictures.  It is orange with little green stripes on it.  It is a mix of butternut and delicata.  It is one of the best squashes I have had.  Loved it.  My new favorite.  This is what I used in the recipe.

Thursday, February 10, 2011

Pear and Candied Pomegranate Walnuts

Candied walnuts are all the rage in salads now.  I love them but, dang, they are a bit pricey.  After the folks at POM sent me some concentrate I began thinking that candied pomegranate flavored walnuts would be delicious.

I mixed up my concoction and hoped for the best.  I have to say I am very please with the results.  The tricky part of the recipe is to not overcook as the sugar in the mixture can burn.  Even though you may pull them out of the oven and they are a bit wet, they will dry as they cool.

Pomegranate Candied Walnuts

1 cup sugar
6 cups walnuts
1 teaspoon kosher salt
1/4 cup POMegranate concentrate

Toast the walnuts at 375F until lightly golden.  Remove from heat and combine with salt sugar and concentrate in a large mixing bowl.  Reduce the oven to 300F.  Pour nuts out on a parchment lined baking sheet.  Spread them out as evenly as possible.  Bake for about ten minutes.  You need to keep an eye on them so they do not burn.  Remove from oven and leave ont he pan until cooled. Store in an airtight jar.

Full Disclosure:  I did not purchase this POM Pomegranate Concentrate.  The folks at POM sent it to me in exchange for some recipe experimentation.  I gladly agreed.